


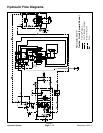
Reelmaster 5010- HHydraulic System Page 4 - 6
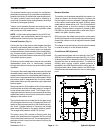
Hydraulic Fitting Installation (SAE Straight Thread O- Ring Fitting into Component Port)
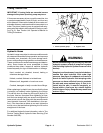
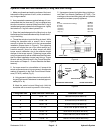
Non- Adjustable Fitting (Fig. 7)
1. Make sure all threads and sealing surfaces of fitting
and component port are free of burrs, nicks, scratches
or any foreign material.
2. As a preventative measure against leakage, it is rec-
ommended that the O- ring be replaced any time the
connection is opened.
3. Lightly lubricate the O- ring with clean hydraulic oil.
Fittingthreads shouldbeclean withnolubricant applied.
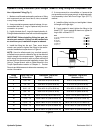
IMPORTANT: Before installing fitting into port, de-
termine port material. If fittingistobeinstalledinto
an aluminum port, installation torque is reduced.
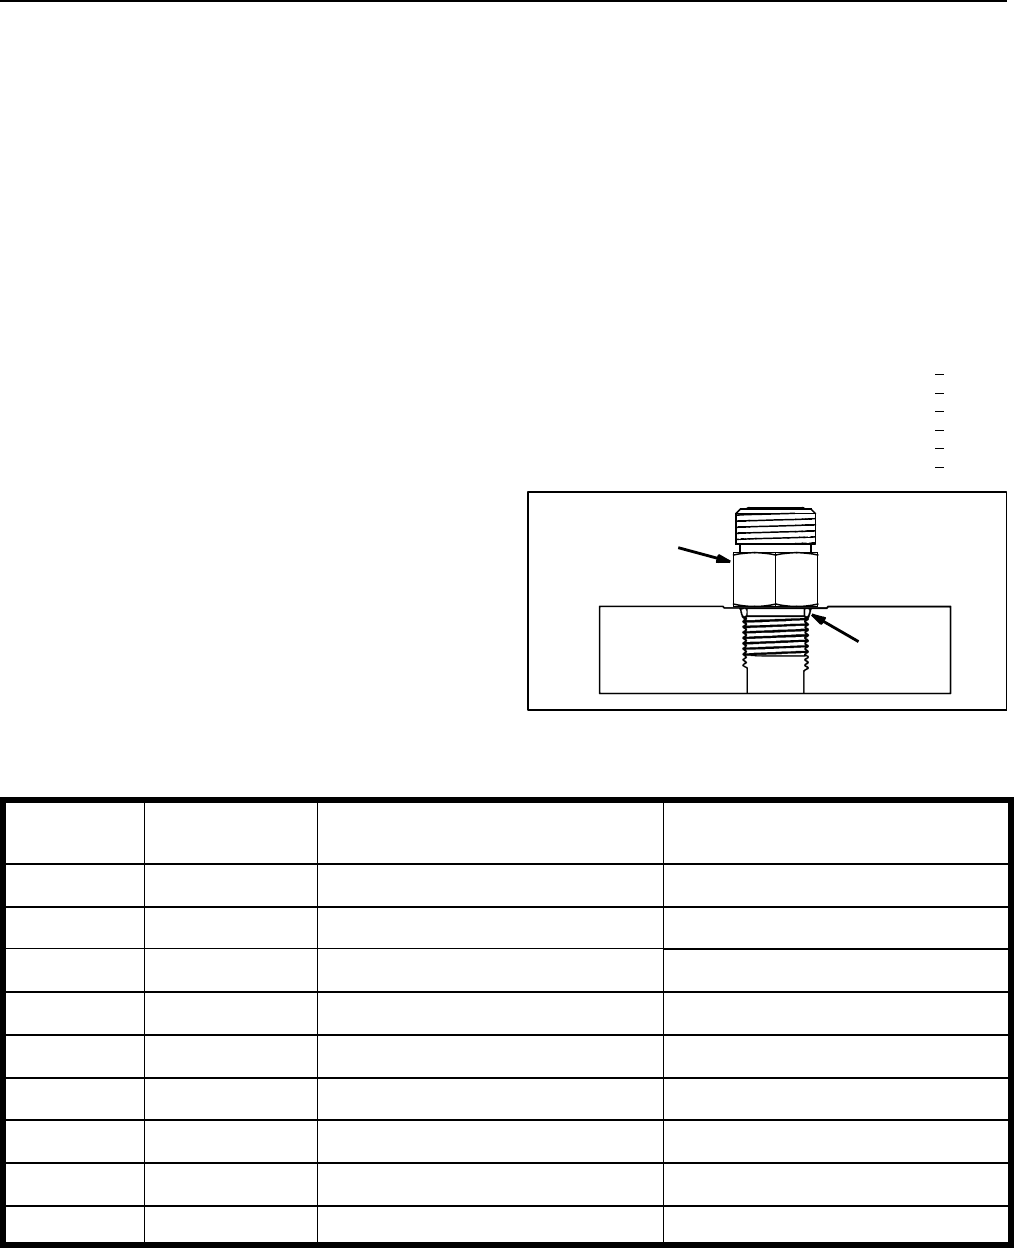
4. Install the fitting into the port. Then, use a torque
wrench and socket to tighten the fitting to the recom-
mended inst allation torque shown in Figure 8.
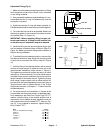
NOTE: Useofanoffsetwrench(e.g.crowfootwrench)
will affect torque wrench calibration due to the effective
length change of the torque wrench. Tightening torque
when using a torque wrench with an offset wrench will
be less than the recommended installation torque. See
UsingaTorqueWrenchwithanOffsetWrenchinthe
Torque Specifications section of Chapter 2 - Product
Records and Maintenance todetermine necessarycon-
version information.
5. If a torque wrench is not available, or if space at the
port prevents useof a torquewrench, analternate meth-
od of assembly is the Flats From Finger Tight (F.F.F.T.)
method.
A. Install the fitting into the port and t ighten it down
full length until finger tight.
B. If port material is steel, tighten the fitting to the
listed F.F.F.T. If port material is aluminum, tighten f it-
ting to 60% of listed F.F.F.T.
Size F.F.F.T.
4 (1/4 in. nominal hose or tubing) 1.00 +
0.25
6 (3/8 in.) 1.50 +
0.25
8 (1/2 in.) 1.50 +
0.25
10 (5/8 in.) 1.50 +
0.25
12 (3/4 in.) 1.50 +
0.25
16 (1 in.) 1.50 +
0.25
Figure 7
O-ring
Fitting
Fitting
Dash Size
Fitting Port Side
Thread Size
Installation Torque Into
Steel Port
Installation Torque Into
Aluminum Port
4 7/16 - 20 15 to 19 ft- lb (21 to 25 N- m) 9to11ft-lb(13to15N-m)
5 1/2 - 20 18 to 22 ft- lb (25 to 29 N- m) 11 to 15 ft- lb (15 to 20 N- m)
6 9/16 - 18 34 to 42 ft- lb (47 to 56 N- m) 20 to 26 ft- lb (28 to 35 N- m)
8 3/4 - 16 58 to 72 ft- lb (79 to 97 N- m) 35 to 43 ft- lb (48 to 58 N- m)
10 7/8 - 14 99 to 121 ft- lb (135 to 164 N- m) 60 to 74 ft- lb (82 to 100 N- m)
12 11/16- 12 134to164ft-lb(182to222N-m) 81to99ft-lb(110to134N-m)
14 13/16- 12 160to196ft-lb(217to265N-m) 96 to 118 ft- lb (131 to 160 N- m)
16 15/16- 12 202to248ft-lb(274to336N-m) 121to149ft-lb(165to202N-m)
20 15/8- 12 247to303ft-lb(335to410N-m) 149to183ft-lb(202to248N-m)
Figure 8