


Reelmaster 5010- H Hydraulic SystemPage 4 - 103
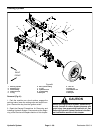
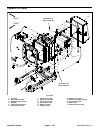
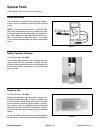
Removal (Fig. 85)
1. Park machine on a level surface, lower cutting units,
stop engine, engage parking brake and remove key
from the ignition switch.
2. Unlatch and open the rear screen.
3. Remove battery to ease oil cooler removal (see 12
Volt Battery Service in the Service and Repairs section
of Chapter 5 - Electrical System).
4. Label all oil cooler hydraulic connections for as-
sembly purposes. Thoroughly clean hydraulic connec-
tions prior to loosening hydraulic hoses at oil cooler.
5. Loosen hose clamps that secure hydraulic hoses to
oil cooler fittings. Remove hoses from oil cooler. Allow
hoses to drain into a suitable container.
6. Rotate clamps that secure oil cooler to radiator
frame.
7. Carefully remove oil cooler from machine.
8. If necessary, remove clamps and brackets from oil
coolerusingFigure85asaguide.
Inspection
1. Back flushoil coolerwith cleaningsolvent. Aftercool-
er is clean, make sure all solvent is drained from the
cooler.
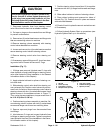
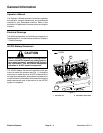
CAUTION
Useeye protection such asgoggles whenusing
compressed air to clean the oil cooler.
2. Dry inside of oil cooler using compressed air in the
opposite direction of oil flow.
3. Plug both ends of oil cooler. Clean exterior of cooler.
Make sure oil cooler fins are clear of dirt and debris.
4. The oil cooler should be free of corrosion, cracked
tubes or excessive pitting of tubes.
Installation (Fig. 85)
1. If removed, install clamps and brackets to oil cooler
usingFigure85asaguide.
2. Position oil cooler to radiator and secure with
clamps.
3. Install hydraulic hoses to oil cooler fittings and se-
cure with hose clamps.
4. Install battery(see 12 Volt Battery Servicein the Ser-
vice and Repairs section of Chapter 5 - Electrical Sys-
tem).
5. Close and secure rear screen.
6. Check oil level in hydraulic reservoir and add correct
oil if necessary.
Hydraulic
System