


Reelmaster 7000Hydraulic System Page 4 -- 8
Hydraulic Fitting Installation (SAE Straight Thread O--Ring Fitting into Component Port)
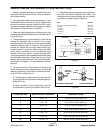
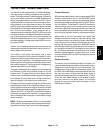
Non--Adjustable Fitting (Fig. 6)
1. Make sure all threads and sealing s urfaces of fitting
and component port are free of burrs, nicks, scratches
or any foreign material.
2. As a preventativemeasure against leakage, it is rec-
ommended that the O--ring be replaced any time the
connection is opened.
3. Lightly lubricate the O--ring with clean hydraulic oil.
Fittingthreads shouldbeclean withnolubricantapplied.
IMPORTANT: Before installing fitting into port, de -
termine port material. If fitting is to be installed into
an aluminum port, installation torque is reduced.
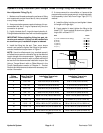
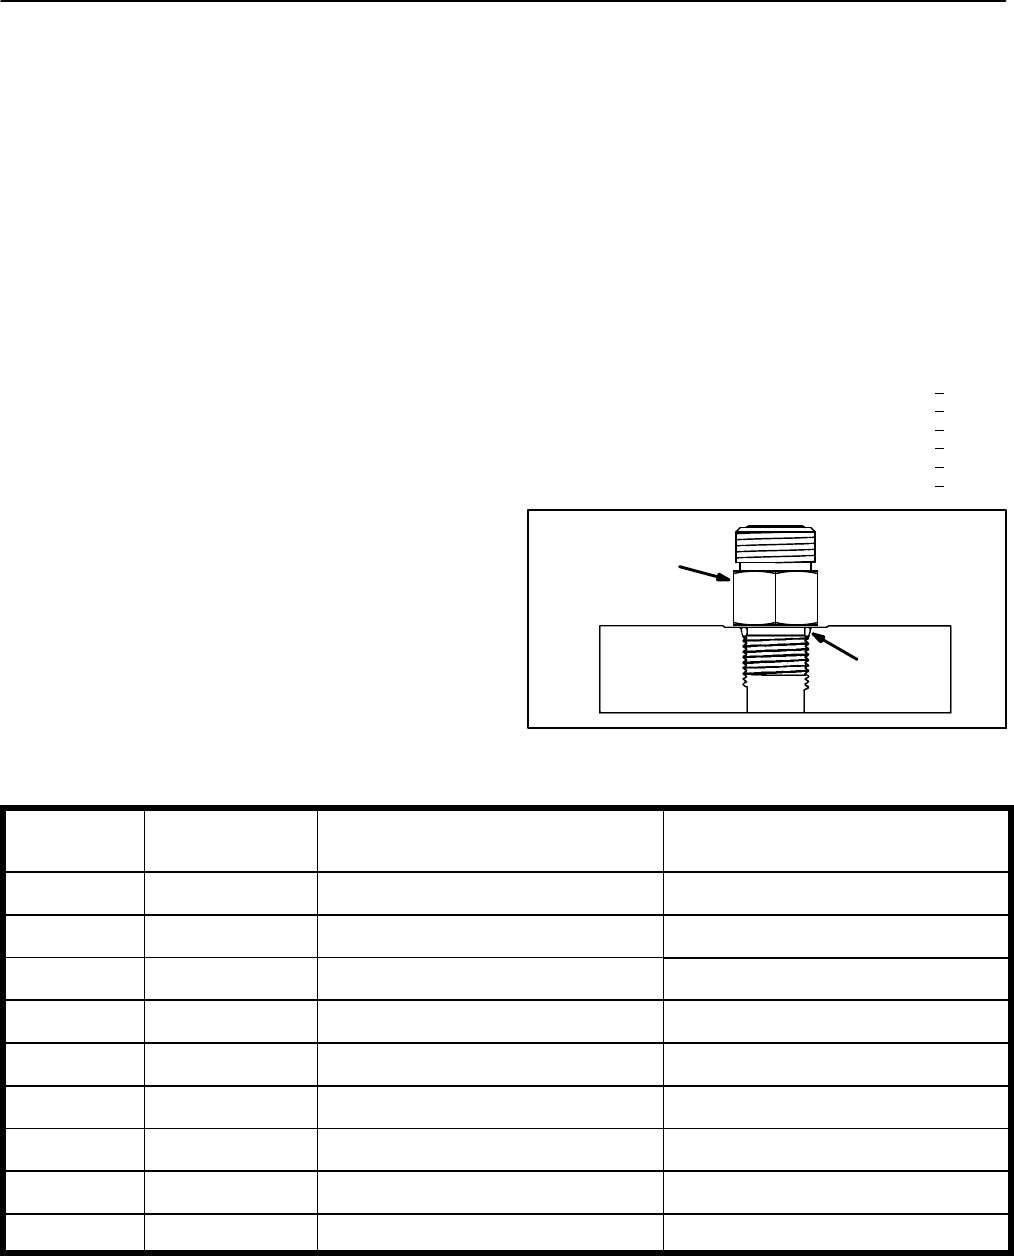
4. Install the fitting into the port. Then, use a torque
wrench and socket to tighten the fitting to the recom-
mended installation torque shown in Figure 7.
NOTE: Use of an offset wrench (e.g. crowfoot wrench)
will affect torque wrench calibration due to the effective
length change of the torque wrench. Tightening torque
when using a torque wrench with an offset wrench will
be less than the recommended installation torque. See
Using a Torque Wrench with an Offset Wrench in the
Torque Specifications section of Chapter 2 -- Product
Records andMaintenance todetermine necessarycon-
version information.
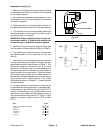
5. If a torque wrench is not available, or if space at the
portprevents useof atorquewrench, analternate meth-
od of assembly is the Flats From Finger Tight (F.F.F.T.)
method.
A. Install the fitting into the port and tighten it down
full length until finger tight.
B. If port material is steel, tighten the fitting to the
listed F.F.F.T. If port material is aluminum, tighten fit-
ting to 60% of listed F.F.F.T.
Size F.F.F.T.
4 (1/4 i n. nominal hose or tubing) 1.00 +
0.25
6(3/8in.) 1.50+
0.25
8(1/2in.) 1.50+
0.25
10 (5/8 in.) 1.50 +
0.25
12 (3/4 in.) 1.50 +
0.25
16 (1 in.) 1.50 +
0.25
Figure 6
O--ring
Fitting
Fitting
Dash Size
Fitting Port Side
Thread Size
Installation Torque Into
Steel Port
Installation Torque Into
Aluminum Port
4 7/16 -- 20 15to19ft--lb(21to25N--m) 9to11ft--lb(13to15N--m)
5 1/2 -- 20 18to22ft--lb(25to29N--m) 11to15ft--lb(15to20N--m)
6 9/16 -- 18 34to42ft--lb(47to56N--m) 20to26ft--lb(28to35N--m)
8 3/4 -- 16 58to72ft--lb(79to97N--m) 35to43ft--lb(48to58N--m)
10 7/8 -- 14 99 to 121 ft--lb (135 to 164 N--m) 60 to 74 ft--lb (82 to 100 N--m)
12 11/16--12 134 to 164 ft--lb (182 to 222 N--m) 81 to 99 ft--lb (110 to 134 N--m)
14 13/16--12 160 to 196 ft--lb (217 to 265 N--m) 96 to 118 ft--lb (131 to 160 N--m)
16 15/16--12 202 to 248 ft--lb (274 to 336 N--m) 121 to 149 ft--lb (165 to 202 N--m)
20 15/8--12 247 to 303 ft--lb (335 to 410 N--m) 149 to 183 ft--lb (202 to 248 N--m)
Figure 7