


Reelmaster 7000
DPA Cutting Units
Page 8 -- 22
Bedknife Replacement and Grinding
Bedknife Removal
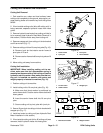
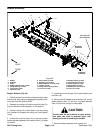
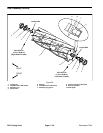
1. Remove bedbar from cutting unit (see Bedbar Re-
moval in this section).
2. Remove screws from bedbar using a socket wrench
and bedknife screw tool (see Special Tools). Discard
screws. Remove bedknife from the bedbar (Fig. 26).
Bedknife Installation
1. Use scraper to remove all rust, scale and corrosion
from bedbar surface. Lightly oil bedbar surface before
installing bedknife.
2. Make sure that screw threads in bedbar
(5/16--18UNC--2A) are clean. Apply antiseize lubricant
to the threads of new screws. Take care to keep anti-
seize lubricant from taper on screw heads.
IMPORTANT: Do not use an impact wrench to tight-
en screws into the bedbar.
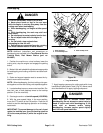
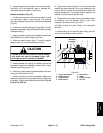
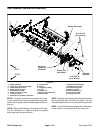
3. Usenew screwsto secure bedknifeto bedbar.Install
all screws but do not tighten fully. Then, using a torque
wrench and bedknife screw tool, torque screws from
200 to250 in--lb(23 to2 8 N--m). Usea torquingpattern
workingfrom thecenter towardeachend ofthe bedknife
(Fig. 27).
4. After installing bedknife to bedbar, grind bedknife.
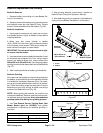
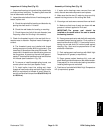
Bedknife Grinding
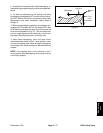
Since there can be variationsin the mounting surface of
the bedbar, a new bedknife will not be perfectly flat after
it is installed to the bedbar. Because of this, it is neces-
sary to grind a new bedknife after installing it to the bed-
bar. Follow the existing angle that was ground into the
bedknife and grind only enough to make sure the top
surface of the bedknife is true (Fig. 28).
NOTE: When grinding the bedknife, be careful to not
overheat the bedknife. Remove small amounts of mate-
rialwitheach passofthegrinder.Also,cleananddress
grinding stone often during the grinding process.
1. Use Toro General Service Training Book, Reel
Mower Basics (part no. 09168SL) and grinder
manufacturer’s instructions for bedknife grinding in-
formation.
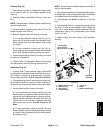
Bedknife Grinding Specifications (see Fig. 28)
Bedknife Relief Angle 3
o
to 7
o
Bedknife Front Angle 3
o
to 7
o
Minimum Bedknife Lip Height 0.190” (4.8 mm)
2. After grinding bedknife, check lead--in chamfer on
bedknife (see Cutting Unit Operator’s Manual).
3. After bedknife grinding is complete, install bedbar to
cutting unit (see Bedbar Installation in this section).
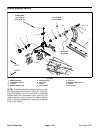
1. Screw
2. Bedbar
3. Bedknife
Figure 26
Antiseize
Lubricant
200 to 250 in--lb
(23to28N--m)
Lightly Oil
Bedbar Surface
1
2
3
Figure 27
12468357910
Figure 28
Relief Angle
Front Angle
Top Face
Front
Face
Remove
Burr
Bedknife
Lip
Height