


Reelmaster 7000
DPA Cutting Units
Page 8 -- 12
Reel Bearing Adjustment
Toinsure cutquality and longlife of thecutting reel bear-
ings, periodically check reel bearing adjustment.
Check Reel Bearing Adjustment
1. Remove hydraulic reel motor from cutting unit (see
Hydraulic Reel Motor Removal in the Service and Re-
pairs section of this chapter).
2. Loosen bedknife to reel adjustment until no contact
exists (see Cutting Unit Operator’s Manual).
CAUTION
Contact with the reel, bedknife or other cutting
unit parts can result in personal injury. Use
heavy gloves when handling the cutting reel.
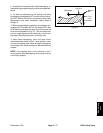
3. Hold on to the reel shaft and try to move the reel as-
sembly side to side. If reel end play exists, side to side
movement will be detected.
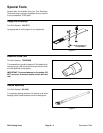
4. Using a suitable torque wrench and spline insert tool
(see Special Tools), measure the rolling resistance of
the cutting reel.Cutting reel rollingtorque should notex-
ceed 10 in--lb (1.1 N--m).
5. Ifreelhasendplayorif rollingtorqueisincorrect,per-
form reel bearing adjustment (see below).
6. After checking or adjusting reel bearings, adjust cut-
ting unit (see Cutting Unit Operator’s Manual).
7. Install hydraulic reel motor to cutting unit (see Hy-
draulic Reel Motor Installation in the Service and Re-
pairs section of this chapter).
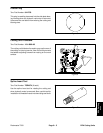
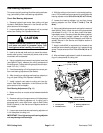
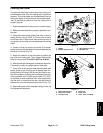
Reel Bearing Adjustment (Fig. 11)
1. Make sure that no contact exists between bedknife
and reel.
2. Remove cutting unit components on LH side plate to
allow access to bearing adjuster nut. If cutting unit is
equipped with a rear roller brush, refer to Rear Roller
Brush (Optional) in the Service and Repairs section of
this chapter.
3. Loosen set screw that secures bearing adjuster nut
in LH side plate of cutting unit.
IMPORTANT: Over tightening reel bearing adjuster
nut may damage reel bearings.
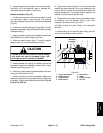
4. With the cutting unitand reel in a horizontal position,
usea13/8”socketandtorquewrenchtoovertightenthe
bearing adjuster nut to 40 to 45 in--lb (4.5 to 5.1 N--m).
5. Loosen the bearing adjuster nut and then torque
bearing adjuster nut from 15 to 17 in--lb (1.7 to 1.9
N--m).
6. Using a suitable torque wrench and spline insert tool
(see Special Tools), check that reel rolling torque does
not exceed 10 in --lb (1.1 N--m). Also, check if reel bear-
ingendplay exists.Ifendplay existsafter bearingadjust-
er nut is properly torqued, replace the cutting reel
bearings and seals (see Reel Assembly and Reel As-
sembly Service in the Service and Repairs section of
this chapter).
7. Apply Loctite #242 (or equivalent) to threads of set
screw and secure bearing adjuster nut in place with set
screw. Torque set screw from 12 to 15 in-- lb (1.4 to 1.7
N--m).
8. Afterreelbearing adjustment,installall removedcut-
ting unit components to cutting unit.
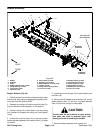
1. LH side plate
2. Threaded insert
3. Bearing adjuster nut
4. Set screw
Figure 11
12 to 15 in--lb
(1.4 to 1.7 N--m)
15 to 17 in--lb
(1.7 to 1.9 N--m)
1
2
3
4