


Reelmaster 7000Page 6 -- 24Axles, Planetaries and Brakes
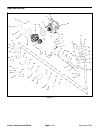
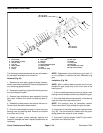
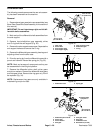
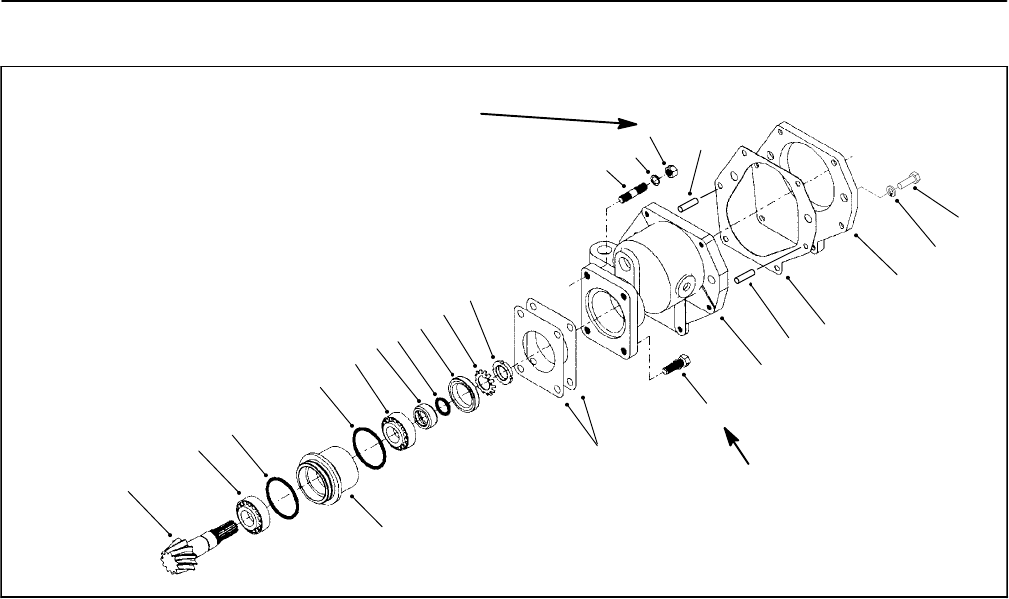
Input Shaft/Pinion Gear
Figure 28
1
1. Nut (2 used)
2. Lock washer (2 used)
3. Stud (2 used)
4. Lock nut
5. Stake washer
6. Oil seal
7. O-ring
8. Seal collar
9. Bearing
10. O-ring
11. Input shaft/pinion gear
12. Bearing case
13. Shim
14. Screw (2 used)
15. Gear case
16. Gasket
17. Cover plate
18. Dowel pin
19. Lock washer (6 used)
20. Cap screw (6 used)
2
3
4
5
6
7
8
9
10
9
11
12
13
14
15
16
17
10
18
18
35 to 41 ft--lb
(47to56N--m)
35 to 41 ft--lb
(47to56N--m)
19
20
The following procedures assume the rear axle assem-
bly has been removed from the machine.
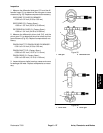
Removal (Fig. 28)
1. Remove the cover plate, gasket and gear case as-
sembly fromthe axle assembly. Removethe gasketand
any remaining gasket material.
2. Remove the retaining rings andthe drivengear from
the input shaft/pinion gear.
3. Remove input shaft/pinion gear assembly from the
gear case. Remove the shims and bearing case O-
rings.
4. Release the stake washer and remove the lock nut.
Remove and discard the stake washer.
5. Drive the input shaft/pinion gear out from the outer
bearing cone and bearing case. Remove and discard
the oil seal and O-ring.
6. Inspect all gears, shafts, bearings, spacers and
cases for damage and wear. Replace components as
necessary.
NOTE: Replacement input shaft/pinion gear (item 11)
is only available in matched set with differential ring
gear.
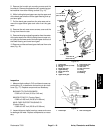
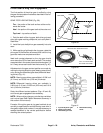
Installation (Fig. 28)
NOTE: When installing bearing cones onto the input
shaft/pinion gear, press only on the inner race of the
bearing cone.
1. If the inner bearing cone was removed, press a new
bearingcone alltheway ontotheinputshaft/pinion gear.
2. Place the shaft and bearing assembly in the bearing
case and install the outer bearing cone.
NOTE: The bearings must be completely seated.
There should be no input shaft/pinion gear end play.
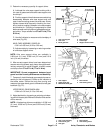
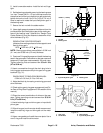
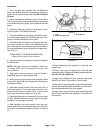
3. Coat a new oil seal with grease and install as shown
(Fig. 29). The seal should be installed with the garter
spring towards the hydraulic motor location.
4. Coat new O-ring with grease. Install O-ring in the oil
seal collar and install the collar.