


Reelmaster 7000 Page 6 -- 11 Axles, Planetaries a nd Brakes
NOTE: Theplanetarywheeldriveassemblycanbeser-
viced with the planetary installed to machine. If the
spindle(item1) needstobe removedfrommachine, see
Planetary Wheel Drive Assembly in this section.
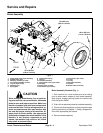
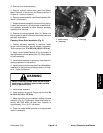
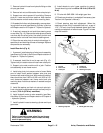
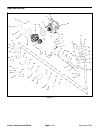
Disassembly (Figs. 7 and 8)
1. If planetary wheel drive assembly is installed on ma-
chine:
A. Park machine on a level surface, lower c utting
units, stop engine and remove key from the ignition
switch.
B. Drain oil from planetary wheel drive/brake as-
sembly.
C. Chock rear wheels and jack up front of machine
(see Jacking Instructions in Chapter 1 -- Safety).
Support machine with jack stands.
D. Remove front wheel assembly.
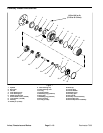
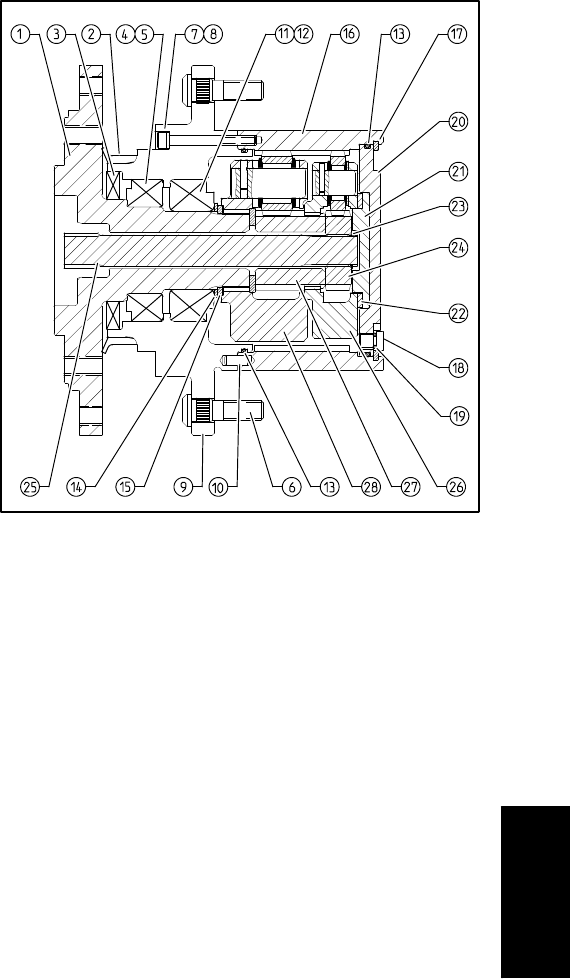
2. Remove retaining ring (item 17).
3. Removeend cap(item 20).Thrustplug (item21) and
thrust washer (item 22) usually remain in end cap bore
and should be removed for cleaning and inspection.
4. Remove drive shaft assembly (items 23, 24 and 25)
If necessary, remove retaining ring and primary gear
from shaft.
5. Remove primary carrier (item 26), secondary gear
(item 27) and secondary carrier (item 28).
NOTE: Steps 6 through 10 are necessary only if in-
specting or replacing bearings and/or seals.
IMPORTANT: Do not reuse retaining ring (item 10)
after it has been removed.
6. Remove retaining ring (item 15) and thrust washer
(item 14). Discard retaining ring.
7. Carefullyremove housing (item9) from spindle(item
1). Remove outer bearing cone (item 12).
8. Remove and discard seals (items 2 and 3) and O--
rings (item 13) from housing.
9. Remove inner bearing cone (item4) from housing. If
necessary, remove bearing cups (items 5 and 11) from
housing.
10.If wheel stud (item 6) removal is necessary, use
press to extract stud(s) from housing.
11.If necessary, remove socket head screws (item 7)
withlockwashers (item8)thatsecureringgear (item16)
to housing. Remove ring gear and two (2) dowel pins
(item 10) from housing.
Figure 8
Assembly (Figs. 7 and 8)
1. Thoroughlycleanparts insolventanddry completely
after cleaning. Inspect parts for damage or excessive
wear and replace as necessary.
2. If any wheel studs were removed, use a press to
install new studs into housing. Make sure that stud
shoulder is fully pressed against housing surface.
NOTE: Use new seal and shim kits when assembling
planetary wheel drive.
3. If spindle and housing were separated:
A. Press bearing cups (items 5 and 11) into housing
(item 9). Cups should be pressedfully to shoulder of
the housing bore.
B. Set inner bearing cone (item 4) into inner bearing
cup.
C. Make sure thatseal bore in housing is thoroughly
cleaned. If OD of seal (item 3) is not rubber or does
not have a sealant coating, apply light coating of sili-
cone sealant toseal bore in housing. Install seal into
housing so it is flush with housing face. Lightly
grease seal lips.
D. Pack boot seal (item 2) with grease and install on
housing.
E. If ring gear was removed from housing, place
dowel pins (item 10) in housing. Secure ring gear to
housing with lock washers (item 8) and socket head
screws (item 7). Torque socket head screws from
118 to 144 in--lb (13.3 to 16.3 N--m).
Axles, Planetaries
and Brakes