


Reelmaster 3550−DHydraulic System Page 4 − 84
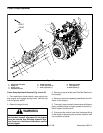
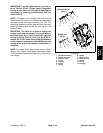
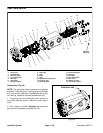
Installation (Fig. 52)
1. If fittings were removed from gear pump, lubricate
and place new O−rings onto fittings. Install fittings into
pump openings using marks made during the removal
process to properly orientate fittings. Tighten fittings
(see Hydraulic Fitting Installation in the General Infor-
mation section of this chapter).
2. Make sure mounting and O−ring sealing surfaces on
the gear pump and piston pump are clean.
3. Apply clean hydraulic oil to gear pump flange O−ring.
Place O−ring on the gear pump.
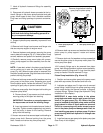
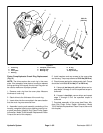
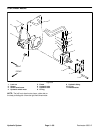
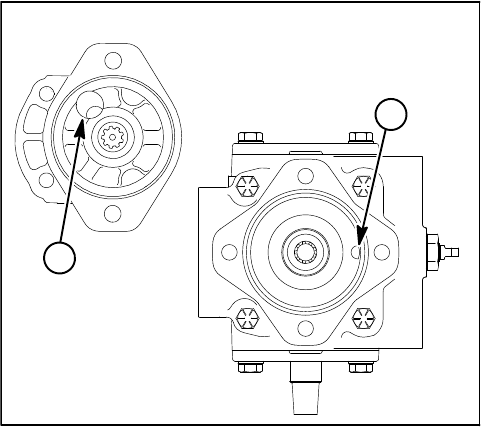
IMPORTANT: A case drain exists in the piston
pump/hydrostat and a suction port is near the input
shaft of the gear pump (Fig. 53). Before the gear
pump is installed to the piston pump, make sure that
plugs placed in either of these ports are removed.
Failure to remove plugs will cause excessive pres-
sure in the piston pump and damage seals. Also, be-
fore installing gear pump to piston pump, fill piston
pump housing with clean hydraulic oil through case
drain hole.
4. Remove plugs that were placed in piston pump case
drain and gear pump suction port. Fill piston pump hous-
ing with clean hydraulic oil through case drain hole.
IMPORTANT: The gear pump suction fitting must be
on the same side as the trunnion of the piston pump.
5. Align gear teeth and slide gear pump input shaft into
piston pump coupler. Secure gear pump to piston pump
with two (2) cap screws and flat washers.
1. Piston pump/hydrostat
case drain
2. Gear pump suction por
t
Figure 53
Remove plugs before installing
gear pump to piston pump
2
1
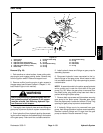
6. Remove caps and plugs from gear pump fittings and
hoses. Using labels placed during gear pump removal,
properly connect hydraulic lines to pump (see Hydraulic
Hose and Tube Installation in this chapter).
7. Fill hydraulic tank with new hydraulic fluid.
8. Install muffler to the engine (see Exhaust System in
Chapter 3 − Kubota Diesel Engine in this manual).
9. Properly fill hydraulic system (see Charge Hydraulic
System in this chapter).
10.Lower and secure hood.