


15-6
Limit Test Commands
SSCReen:AREA
command. If the results of consecutive limit tests must be stored in different files, omit the <filename>
parameter and use the default filename instead. Each screen image will be saved in a different file named
MeasLimitScreenX.bmp, where X is an incremental number assigned by the instrument.
The filename field encodes the network path and the directory in which the file will be
saved, as well as the file format that will be used. The following is a list of valid filenames.
If a filename is specified without a path, the default path will be
D:\User Files\screen images. The default file type is a bitmap (.bmp). The fol-
lowing graphics formats are available by specifying a file extension: PCX files (.pcx), EPS
files (.eps), Postscript files (.ps), JPEG (.jpg), TIFF (.tif) and GIF files (.gif).
Example The following example saves a copy of the screen to the disk in the event of a failure. Addi-
tional disk-related controls are set using the SSCReen:AREA and SSCReen:IMAGe com-
mands.
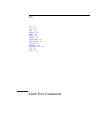
10 OUTPUT 707;”:LTEST:SSCREEN DISK”
Query :LTESt:SSCReen?
The query returns the current state of the SSCReen command.
Returned Format [:LTESt:SSCReen] {OFF | DISK [,<filename>]}<NL>
Example The following example returns the destination of the save screen when a failure occurs.
10 DIM SSCR$[50]
20 OUTPUT 707;”:LTESt:SSCREEN?”
30 ENTER 707;SSCR$
SSCReen:AREA
Command :LTESt:SSCReen:AREA {GRATicule | SCReen}
This command selects which data from the screen is to be saved to disk when the run until
condition is met. When you select GRATicule, only the graticule area of the screen is saved
(this is the same as choosing Waveforms Only in the Specify Report Action for measurement
limit test dialog box). When you select SCReen, the entire screen is saved.
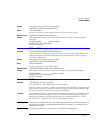
Valid Filenames
Filename File Saved in Directory...
“Test1.gif” D:\User Files\Screen Images\
(C drive on 86100A/B instruments.)
“A:test2.pcx” A:\
“.\screen2.jpg” File saved in the present working directory, set
with the command :DISK:CDIR.
“\\computer-ID\d$\test3.bmp” File saved in drive D: of computer “computer-ID”,
provided all permissions are set properly. (C drive
on 86100A/B instruments.)
“E:test4.eps” File saved in the instrument’s drive E:, that could
be mapped to any disk in the network.