


Groundsmaster 5900/5910 Page 3 -- 19 Diesel Engine
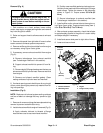
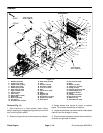
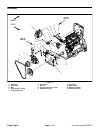
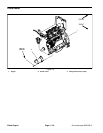
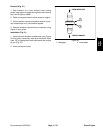
Removal (Fig. 17)
1. Park machine on a level surface, lower cutting
decks, stop engine, engage parking brake and remove
key from the ignition switch.
2. Raise and support hood to allow access to engine.
3. Remove battery access panel. Disconnect negative
battery cable first and then positive battery cable (see
Battery Removal in the Service and Repairs section of
Chapter 5 -- Electrical System).
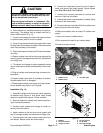
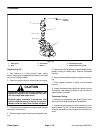
4. Loosen flange head screw (item 5) that secures al-
ternator to adjusting bracket. Rotate alternator toward
engine to loosen drive belt. Remove belt from alternator
pulley.
5. Inspect drive belt for glazing or damage. Replace
belt if necessary.
6. For assembly purposes, label all wires that connect
to alternator. Disconnect wires from alternator terminals
and position wires away from alternator.
7. Support alternator to prevent it from shifting or fal-
ling.
8. Remove flange head screw and flat washer that se-
cure alternator to adjusting bracket (item 12). Remove
cap screw, two (2) bevel washers and hex nut that se-
cure alternator to mounting brackets (items 9 and 13).
9. Carefully remove alternator from engine and ma-
chine.
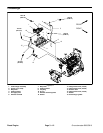
Installation (Fig. 17)
1. Position alternator to engine brackets.
2. Secure alternator to mounting brackets and adjust-
ingbracketwithr emoved fasteners and washers.Donot
fully tighten fasteners.
3. Place drive belt on alternator pulley. Rotate alterna-
tor away from engine to properly tension drive belt.
4. Tighten screws to secure alternator. Torque cap
screw at mounting bracket (item 10) to 49 ft--lb (66
N--m). Torque flange head screw at adjusting bracket
(item 5) to 23 ft--lb (31 N--m).
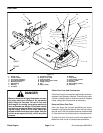
5. Using labels placed during alternator removal, cor-
rectly connect all wires to alternator terminals.
6. Connectpositive battery cable topositivebattery ter-
minal. Then, connect negative battery cable to negative
battery terminal (see Battery Installation in the Service
and Repairs section of Chapter 5 -- Electrical System).
Install battery access panel.
7. Lower and secure hood.
Diesel
Engine