


Groundsmaster 5900/5910Page 5 -- 30Electrical System
Adjustments
Traction Pedal Calibration
IMPORTANT: A properly installed and calibrated
traction pedal potentiometer is critical to accurate
traction system response and for reliable sensor
life. Use care when removing, installing and cali-
brating the traction pedal potentiometer.
1. Park machine on a level surface, lower cutting
decks, stop engine and apply parking brake.
2. Make sure that wire harness connector is plugged
into traction pedal potentiometer.
3. Turn ignition switch to ON but do not start engine.
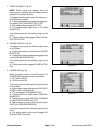
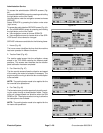
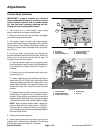
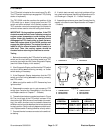
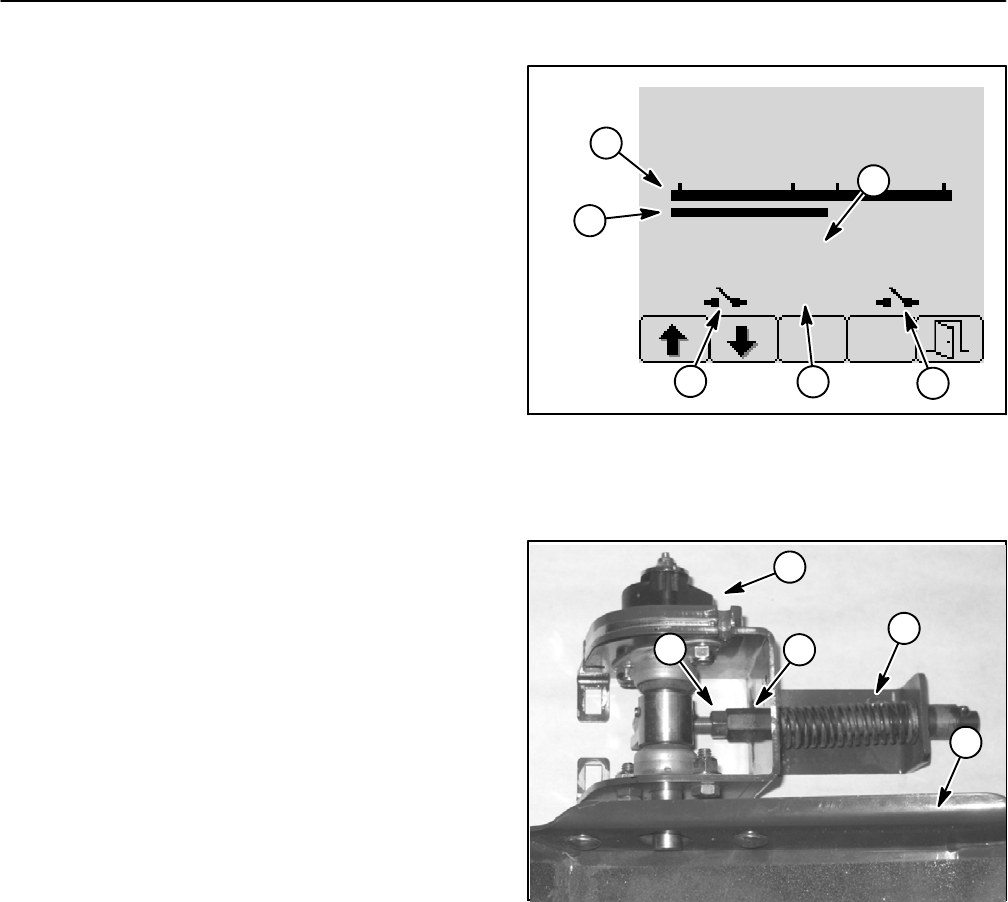
Use the Info Center Display Diagnostic menu (see Info
Center Display in the Service and Repairs section) to
obtain the Traction Pedal Calibrated screen on the dis-
play (Fig. 51).
4. On the bar graph in the screen, the indicator bar
should be between the N R and the NF. Also, the two (2)
switch icons on the screen should both be open. To
change the indicator bar location:
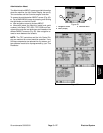
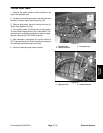
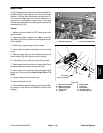
A. Remove traction pedal cover and spring cover
from front platform (see Traction Pedal Disassembly
in the Service and Repairs section of Chapter 6 --
Chassis).
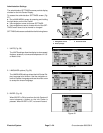
B. Loosen hex nut that secures neutral spring ad-
justment (Fig. 52).
C. Slowly rotate the spring shaft while watching the
switch icons (Fig. 52). When one of the switch icons
close,stoprotatingandmarktheshaftposition.Then
slowly rotate the shaft in the opposite direction until
the second switch icon closes and mark the shaft
position.
D. Rotate the springshaft to the mid--point of thetwo
shaft positions. Tighten the hex nut to secure the ad-
justment. At this setting, the indicator bar should be
between the NR andtheNF. Also, the neutral voltage
value should be within 0.02 V of the midpoint voltage.
NOTE: When adjusting traction pedal, voltage val-
ues should be similar to values shown in Figure 51.
If spring shaft is rotated too quickly during adjust-
ment, voltage values could be considerably different
than the values shown.
5. Test traction system operation.
6. Install traction pedal cover and spring cover to front
platform (see Traction Pedal Assembly in the Service
and Repairs section of Chapter 6 -- Chassis).
1. Bar graph
2. Indicator bar
3. Reverse switch icon
4. Forward switch icon
5. Neutral voltage
6. Midpoint voltage
Figure 51
RNRNFF
2.23 V
NR NF
2.25 V 2.33 V2.18 V
CALIBRATED
TRACTION PEDAL
1
2
4
3
5
6
1. Traction pedal
2. Pedal potentiometer
3. Compression spring
4. Spring shaft
5. Hex nut
Figure 52
1
2
4
3
5