


Reelmaster 2300–D/2600–DHydraulic System Page 4 – 60
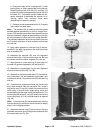
Reel Motor
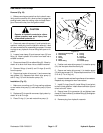
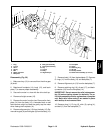
Removal (Fig. 55)
1. Before removing any parts from the hydraulic man-
ifold, park the machine on a level surface, engage the
parking brake, lower the cutting units and stop the en-
gine. Remove the key from the ignition switch.
CAUTION
Operate all hydraulic controls to relieve
system pressure and avoid injury from
pressurized hydraulic oil.
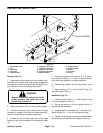
2. Remove reel motor from cutting unit (see Repair
section of Chapter 7 – Cutting Units).
3. Unscrew lock nut (1) and remove coupling (2) from
reel motor (3) using a puller.
4. Clean motor, fittings, and hose connections.
Note: The position of the fittings on the reel motor is
critical to reconnecting hydraulic hoses.
5. Label all hose connections (4) for reassembly pur-
poses. Matchmark reel motor and all hydraulic fittings
(5) for reassembly purposes.
6. Remove hose connections (4) from hydraulic fit-
tings (5). Allow hydraulic oil to drain from hose into a suit-
able container. Put caps or plugs on disconnected
hoses to prevent contamination.
7. Remove hydraulic fittings (5) and O–rings (7) from
reel motor (3).
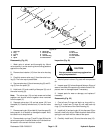
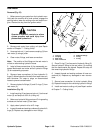
Installation (Fig. 55)
1. Install coupling (2) and secure lock nut (1) to the reel
motor (3) and torque to 35 ft–lb (4.8 kg–m).
2. Make sure hydraulic fitting ports and O–ring sealing
surfaces on the reel motor (3) are clean.
3. Apply clean hydraulic oil to all O–rings.
4. Inspect threads and sealing surfaces of hydraulic fit-
tings (5). Replace any damaged or worn fittings.
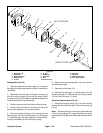
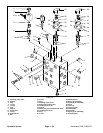
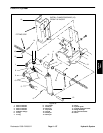
1. Lock nut
2. Coupling
3. Reel motor
4. Hose connection
5. Hydraulic fittings
6. O–ring
7. O–ring
Figure 55
4
4
5
7
3
7
6
1
2
5
6
1
5. Place O–ring (7) on face seal of hydraulic fitting (5).
Secure hydraulic fitting to the reel motor (3) ensuring
that the matchmarks are aligned. Repeat this step for
the remaining hydraulic fittings.
6. Inspect threads and sealing surfaces of hose con-
nections (4). Replace any damaged or worn connec-
tions.
7. Secure hose connection (4) to the hydraulic fitting
(5). Repeat this step for the remaining hydraulic fittings.
8. Install reel motor to cutting unit (see Repair section
of Chapter 7 – Cutting Units).