


Reelmaster 2300–D/2600–DPage 7 – 16Cutting Units
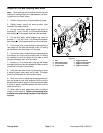
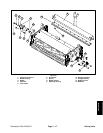
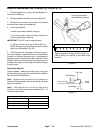
Bedbar Removal and Installation (Fig. 19 through Fig. 21)
Bedbar Removal
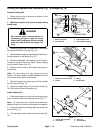
1. Turn bedknife adjusting handle to loosen bedknife
to reel contact (Fig. 19).
2. Remove both jam nuts and hex socket set screws
from the bedbar yoke (Fig. 19)
3. Unscrew adjusting handle (left–hand threaded) un-
til it is removed from the cutting unit (Fig. 19).
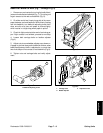
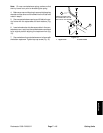
4. Loosen both adjusting lock nuts on the adjusting
housing (Fig. 20).
5. Remove both carriage bolts and nuts from the ad-
justing housing (Fig. 20).
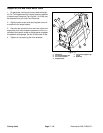
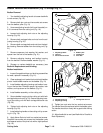
6. Remove both carriage bolts and nuts from the bed-
bar housing. Remove bedbar from the cutting unit (Fig.
21).
7. Remove capscrew, lock washer, flat washer, and
spacer from the end of the bedbar (Fig. 21).
8. Remove adjusting housing and bedbar housing
from the bed bar. Remove bedbar washer (Fig. 21).
9. Sharpen or replace bedknife as necessary (see
Bedknife Replacement and Grinding).
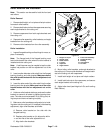
Bedbar Installation
1. Inspect flanged bushings and bushing assemblies
for wear; replace if necessary (Fig. 21).
2. Clean and apply anti–seize lubricant to both bedbar
pivots. Install bedbar washer on the bedbar (Fig. 21)
3. Install bedbar adjusting housing and bedbar hous-
ing on the bed bar. Reinstall spacer, flat washer, lock
washer, and cap screw on the bedbar (Fig. 21).
4. Install bedbar assembly on the cutting unit.
5. Secure bedbar housing to the cutting unit with both
carriage bolts and nuts (Fig. 21). Secure adjusting hous-
ing to the cutting unit with both carriage bolts and nuts
(Fig. 20).
6. Tighten both adjusting lock nuts on the adjusting
housing (Fig. 20).
7. Install adjusting handle on the cutting unit by screw-
ing it in (Fig. 19).
8. Apply Never Seize to both hex socket set screws.
Seat both hex socket set screws into the bedbar yoke
and tapered seats of the pivot hub with a slight preload
(Fig. 19).
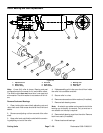
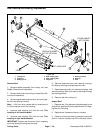
1. Adjusting handle
2. Jam nut
3. Hex socket set screw
4. Bedbar yoke
5. Cutting unit
6. Pivot hub
1
2
3
4
5
Figure 19
6
1. Adjusting lock nut
2. Adjusting housing
3. Carriage bolt and nut
3
2
1
Figure 20
9. Tighten jam nuts onto the hex socket set screws.
The handle should be centered within the bedbar yoke.
The handle should turn freely with a good solid clicking
action.
10. Adjust bedknife to reel (see Bedknife to Parallel to
Reel Adjustment).