


Reelmaster 3100−D
Page 3 − 12
Kubota Diesel Engine
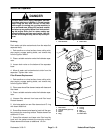
Check Air Filter, Dust Cup, & Burp Valve
The air cleaner body, air filter, dust cup, and burp valve
should be check daily prior to operation.
1. Park machine on a level surface, lower cutting units,
stop engine, engage parking brake, and remove key
from the ignition switch.
2. Check air cleaner body for damage that could cause
possible air leaks. Make sure dust cup seals completely
to the air cleaner body.
3. Check burp valve and dust cup for damage.
4. Make sure air hoses connecting the air cleaner to the
engine and radiator are secured tightly and free of pos-
sible air leaks.
Service Air Filter, Dust Cup, & Burp Valve
The air cleaner filter should be serviced ever 50 hours,
and more frequently in extreme dusty conditions.
1. Park machine on a level surface, lower cutting units,
stop engine, engage parking brake, and remove key
from the ignition switch.
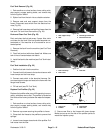
2. Release latches securing air cleaner cover to air
cleaner body. Separate cover from body. Clean inside of
air cleaner cover.
3. Gently slide filter out of air cleaner body to reduce the
amount of dust dislodged. Avoid knocking filter against
air cleaner body.
4. Inspect filter and discard if damaged. Do not wash or
reuse a damaged filter.
IMPORTANT: Do not over service the air filter ele-
ment; damage may result.
Washing Method
A. Prepare a solution of filter cleaner and water.
Soak filter element about 15 minutes. Refer to direc-
tions on filter cleaner carton for complete informa-
tion.
B. After soaking filter for 15 minutes, rinse it with
clear water. Maximum water pressure must not ex-
ceed 40 psi to prevent damage to the filter element.
Rinse filter from clean side to dirty side.
C. Dry filter element using warm, flowing air (160
o
F
maximum), or allow element to air−dry. Do not use a
light bulb to dry the filter element because damage
could result.
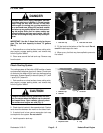
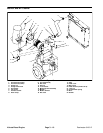
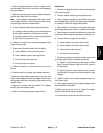
Figure 18
1. Latch
2. Dust cup
3. Burp valve
2
1
3
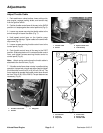
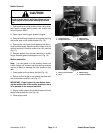
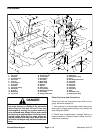
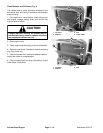
Figure 19
1. Filter element 2. Body
2
1
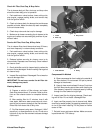
Compressed Air Method
A. Blow compressed air from inside to the outside of
dry filter element. Do not exceed 100 psi to prevent
damage to the element.
B. Keep air hose nozzle at least 2 inches (5 cm) from
the filter. Move nozzle up and down while rotating the
filter element. Inspect for holes and tears by looking
through the filter toward a bright light.
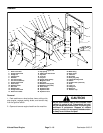
5. Inspect new filter for shipping damage. Check seal-
ing end of filter. Do not install a damaged filter.
6. Insert new filter properly into air cleaner body. Make
sure filter is sealed properly by applying pressure to out-
er rim of filter when installing. Do not press on flexible
center of filter.
7. Reinstall cover and secure latches. Make sure cover
is positioned with TOP side up.