


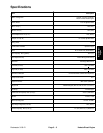

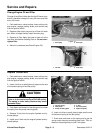

Reelmaster 3100−D Page 3 − 11 Kubota Diesel Engine
Muffler Removal
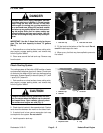
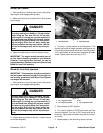
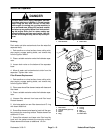
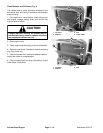
CAUTION
The muffler and exhaust pipe may be hot. To
avoid possible burns, allow the engine and ex-
haust system to cool before working on the muf-
fler.
1. Park machine on a level surface, lower cutting units,
stop engine, engage parking brake, and remove key
from the ignition switch.
2. Open engine hood to gain access to engine.
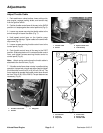
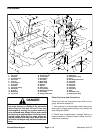
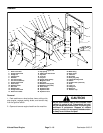
3. Remove both flange head nuts and screws securing
the muffler plate to the muffler bracket (Fig. 16).
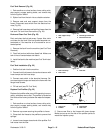
4. Remove four hex nuts and lock washers from the ex-
haust manifold studs. Separate muffler flange from the
exhaust manifold. Remove muffler from the machine
(Fig. 17).
5. Remove gasket from exhaust manifold or muffler
flange. Replace gasket if damaged or torn (Fig. 15).
Muffler Installation
Note: If a new gasket is to be installed, make sure
muffler flange and exhaust manifold sealing surfaces
are free of debris or damage that may prevent a tight
seal.
1. Place gasket on the exhaust manifold (Fig. 15).
2. Secure muffler flange to the exhaust manifold with
four lock washers and hex nuts (Fig. 17).
IMPORTANT: Finger tighten all nuts before secur-
ing the muffler plate to the muffler bracket so there
is no preload on the exhaust manifold.
3. Secure muffler plate to the muffler bracket with both
flange head screws and nuts (Fig. 16).
4. Close engine hood.
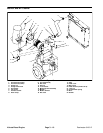
Figure 16
1. Flange head nut
2. Flange head screw
3. Muffler plate
4. Muffler bracket
3
2
4
1
Figure 17
1. Hex nut & lock washer
2. Stud
3. Muffler flange
4. Exhaust manifold
2
1
4
3
Kubota Diesel
Engine