


Greensmaster eFlex 1800/2100 GroomerPage 7 -- 25
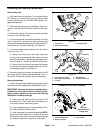
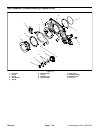
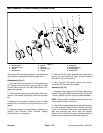
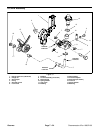
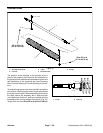
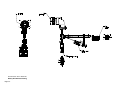
Disassembly (Fig. 31)
1. Parkmachineonlevelsurface.Turnkeyswitchtothe
OFF position and remove key from the switch. Make
sure the traction lever is in the NEUTRAL position. En-
gage parking brake.
2. Disconnect the b attery pack (see Battery Pack Con-
nection in the General Information section of this chap-
ter).
3. Remove flange nut (item 2) that secures lift arm to
HOC groomer arm. Remove lock nut (item 16) and
spring washer (item 17) that secure lift arm to side plate.
Loosen lock screw (item 6) completely.
4. Remove lift arm from cutting unit.
5. Disassemble lift arm using Figure 31 as a guide.
NOTE: Right and left side HOC groomer arms (item 1)
and lift arm assemblies (item 8) are different; other com-
ponents shown in Figure 31 are the same on both sides
of cutting unit.
NOTE: Groovedpin (item 3)is used to retain lock screw
(item 6 ) to lift arm assembly.
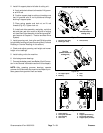
Assembly (Fig. 31)
1. Assemble lift arm using Figure 31 as a guide.
2. Apply antiseize lubricant to threads of groomer lift
rod (item 5) and lift arm assembly stud (item 8).
3. Installlift arm onto cutting unit. Secure with flange nut
(item 2) and lock nut (item 16) with spring washer (item
17).
4. Secure groomer in raised or lowered position with
lock screw (item 6).
5. Check and adjust grooming reel height and mower
height--of--cut settings.
6. When all adjustments have been completed, con-
nect the battery pack (see Battery Pack Connection in
the General Information section of this chapter).
Groomer