


Greensmaster eFlex 1800/2100 Page 4 -- 49 Electrical System
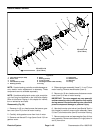
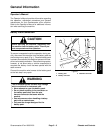
8. Remove six (6) cap screws (item 7 in Fig. 60) and flat
washers (item 6 in Fig. 60) that secure battery pack to
battery base.
9. Carefully remove battery pack from batterybase and
machine.
IMPORTANT: Do not open the lithium battery pack.
With the exception of the battery pack fuse, fuse
cover and labels, there are no consumer service-
able parts on or in the battery pack. If you open the
battery pack, you will void the warranty. The battery
pack is protected by tamper--alerting devices.
Lithium Battery Pack Installation (Fig. 60)
1. Make sure that battery base is raised and supported.
2. Carefully position battery pack to battery base. Bat-
tery connector port should be toward rear of machine.
3. Secure battery pack to battery base with six (6) cap
screws (item 7 in Fig. 60) and flat washers (item 6 in Fig.
60). Torque screws from 100 to 130 in--lb (11.3 to 14.0
N--m).
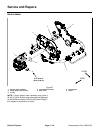
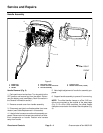
4. Connect the wire harness connector to the battery
pack (Fig. 64):
A. Line up the tabs on the inside of the wire harness
connector with the slots in the battery pack recep-
tacle and press the wire harness connector into the
battery pack receptacle.
B. Rotate the locking collar on the harness connec-
tor clockwise until it engages with the battery pack re-
ceptacle and begins to pull in toward the battery.
Continue rotating the collar approximately 120
o
(1/3
of a turn) until it fully seats.
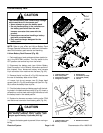
IMPORTANT: When pivotin g battery pack to the
frame, take care to not pinch the wire harness be-
tween machine components.
5. Remove screwdriver or rod used to hold the battery
base in the raised position. Carefully pivot the battery
base and battery pack to the machine frame. Make sure
that the wire h arness is not pinched between machine
components as battery is lowered.
6. Secure rear of battery base to frame with tall nut
(item 8 in Fig. 60). Then, secure front of base to frame
by fully tightening two (2) flange head screws (item 3 in
Fig. 60) and flange nuts (item 4 in Fig. 60).
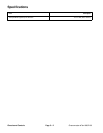
7. Connect battery wire harness 6--pin connector to
machine wire harness (Fig. 62).
8. Connect the battery pack (see Lithium Battery Pack
Connection in the General Information section of this
chapter).
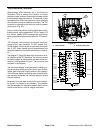
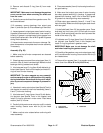
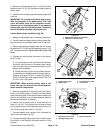
1. Main wire harness 6--pin connector
2. Battery wire harness 6--pin
Figure 62
1
2
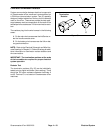
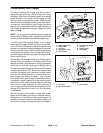
1. Lithium battery pack
2. Battery base
3. Screw/washer (6 used)
4. Locking hole
Figure 63
3
2
4
1
1. Wire harness connector
2. Rotating locking collar
3. Battery receptacle
Figure 64
1
2
3
Electrical
System