


OCTOBER 2006 MAGNUM 1X7 LTO AUTOLOADER
99
CLEANING THE AUTOLOADER
5.
5.5.
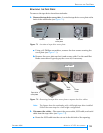
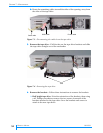
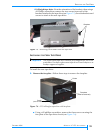
5. Complete the installation—With the wide edge of the tape drive cover
plate toward the bottom, slide the cover plate over the opening in the
autoloader’s back panel (see Figure 7-1). Make sure that the cables aren’t
pinched by the cover plate. Insert and tighten the four screws.
RESUMING OPERATION
To r e su me o p e ra t i o n :
1.
1.1.
1. If you disconnected the SCSI cable, terminator, or Ethernet cable from the
autoloader, reconnect them.
2.
2.2.
2. Reconnect the power cord and power on the autoloader, as described on
page 19.
The autoloader is now ready to resume operation. The new tape drive
automatically assumes the SCSI ID of the old tape drive.
You may want to perform a few cartridge load and unload operations from the
front panel to ensure that the autoloader and the newly installed tape drive
are communicating correctly (see page 68). You may also want to back up
several megabytes of data with the new tape drive and perform a comparison
check on the backed-up data. This determines whether the software and tape
drive are communicating properly.
CLEANING THE AUTOLOADER
The only autoloader components that should be cleaned are the tape drive
and the operator panel.
Instructions for cleaning the tape drive are provided on page 70.
To clean the LCD, use wipes or cleaners appropriate for LCD screens or
computer monitors.
Caution
The autoloader’s internal components are lubricated at the factory and should not
be cleaned or relubricated.
Caution
To avoid scratching the LCD, do not use abrasive cleaners, abrasive cleaning
implements, harsh chemicals, or solvents.