


Groundsmaster 4000−D Page 6 − 11 Axles, Planetaries, and Brakes (Rev. B)
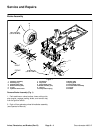
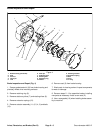
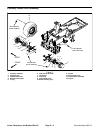
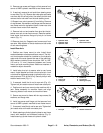
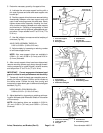
Planetary Wheel Drive Disassembly (Figure 7)
1. Remove retaining ring (12).
2. Remove cover plate (14).
3. Remove input spacer (15) and thrust washer (16).
4. Remove input shaft (17).
5. Remove carrier assembly (18).
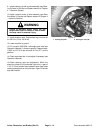
NOTE: Steps 6 −10 are necessary only if inspecting or
replacing bearings and/or seals.
6. Remove cap screws (19) and remove ring gear (11).
7. Remove retaining ring (10) and thrust washer (9).
8. Use a puller to remove spindle (1) from housing (6).
Remove bearing cone (8).
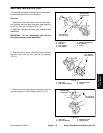
9. Remove and discard all seals.
10.If bearings will be replaced, use a puller to remove
bearing cone (3) from spindle. Remove bearing cups (4
and 7) from housing (6).
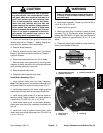
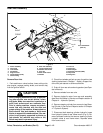
Planetary Wheel Drive Assembly (Figure 7)
NOTE: Use new seal kit when assembling planetary
wheel drive.
1. Clean parts in solvent. Inspect parts for damage or
excessive wear and replace as necessary.
2. Install lip seal (2) to spindle (1).
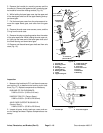
3. Press bearing cups (4 and 7) into housing (6).
4. Press bearing cone (3) onto spindle (1).
5. Install seal (20) to housing (6). Assemble housing (6)
to spindle (1).
6. Press bearing cone (8) onto spindle and secure with
thrust washer (9) and retaining ring (10).
7. Install o−ring (21), then assemble ring gear (11) to
housing (6) with cap screws (19). Torque cap screws to
9 ft−lb (12 N−m).
8. Install carrier assembly (18).
9. Install input shaft (17).
10.Install thrust washer (16) and input spacer (15).
11.Install o−ring (22), then install cover plate (14). Se-
cure cover with retaining ring (12).
12.Check operation of planetary wheel drive before
installing assembly on the machine. With a constant
turning force applied, rotation of the planetary should be
consistent. If there is more drag at certain points, gears
are not rolling freely and the planetary should be ex-
amined for improper assembly or damaged compo-
nents.
Axles, Planetaries,
and Brakes