


Groundsmaster 4000--D Hydraulic System (Rev. B)Page 4 -- 105
Removal
1. Park machine on a level surface, lower cutting units,
stop engine, engage parking brake, and remove key
from the ignition switch.
2. Read the General Precautions for Removing and
Installing Hydraulic System Components at the begin-
ning of the Service and Repairs section of this chapter.
NOTE: To ease reassembly, tag the hydraulic hoses to
show their correct position on the steering cylinder.
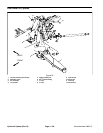
3. Remove hydraulic hoses from steering cylinder.
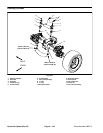
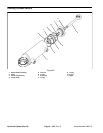
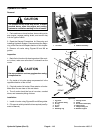
4. Remove cotter pins, hex slotted nuts, axle washer,
and ball joint spacerfrom thethreaded endsof ball joints
(Fig. 81). Remove steering cylinder with ball joints from
machine. Locate and retrieve ball joint spacers from top
of axle assembly.
Installation
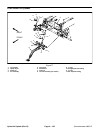
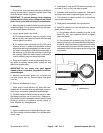
1. Place a washer onto each ball joint. Slide ram end
ball joint through hole on steering arm. Secure with axle
washer and hex slotted nut. Slide fixed end of cylinder
through hole on axle. Install spacer onto ball joint and
secure with hex slotted nut. Torque slotted nuts from 100
to 125 ft--lbs (135 to 169 N--m) prior to inserting cotter
pins.
2. Install hydraulic hoses to steering cylinder.
3. Fill reservoir with hydraulic fluid as required (seeOp-
erator’s Manual).
4. After assembly is completed, operate steering cylin-
der to verify thathydraulic hoses andfittings are notcon-
tacted by anything.
Hydraulic
System