


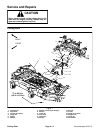

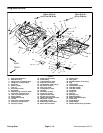


Groundsmaster 4100--DCutting Deck
Page 8 -- 12
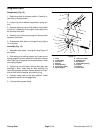
4. Position upper end of links to center cutting deck
brackets.
5. Alignupper end oflinkswith mounting holes incenter
deck. While installing pivot pins to centerdeck andlinks,
insert spacers and washers as follows:
A. Place a hardened spacer (item 42) on each side
of the front link. Use one or two thrust washers on
rear side of assembly so that link is snug between
deck brackets.
B. Place a thrust washer (item 6) on each side of
rear link.
6. Secure pins with carriage screw and flange head
screw.
7. Install cap screw (item 29) to pivot pin on both links.
Cap screw on rear link uses a flat washer (item 28). Cap
screw on front link also secures hose guide (item 38).
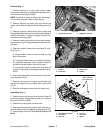
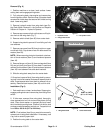
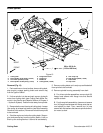
8. Position lift cylinder to the wing deck (Fig. 7). Secure
cylinder with cap screw and lock nut.
9. Install hydraulic motor to cutting deck (see Cutting
Deck Motor Installation in the Service and Repairs Sec-
tion of Chapter 4 -- Hydraulic System).
10.Fully raise wing deck, stop engine and remove key
from the ignition switch. Secure flex shield to wing deck
with shield strap and three (3) washer head screws.
Lower wing deck.
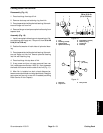
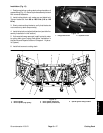
11.Lower wing deck and inspect deck latch assembly to
insure that front link is locked when the wing deck is in
the lowered position. There should be a gap from 0.060”
to 0.090” (1.5 to2.2 mm) between the arm latch actuator
and the latch pivot (Fig. 8). If gap is incorrect, adjust link
position by repositioning the location of the hardened
spacers (item 42) and thrust washers (item 6). At a mini-
mum, there must be a hardened spacer positioned to
the rear of the front link.
12.Lubricate greasefittings on cutting deck and liftcom-
ponents.
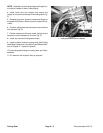
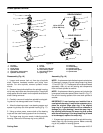
13.Check distance between inner deck blade on wing
deck and outer deck blade on center deck. Distance be-
tween blades should b e 0.380” to 0.620” (9.7 to 15.7
mm) (Fig. 9). If blade distance is incorrect, loosen hex
jam nut (item 32) on rear link assembly and adjust cap
screw (item 31). Tighten jam nut when blade distance is
correct.
14.Check operationof wing deck position switch. Adjust
if necessary (see Wing Deck Position Switches in the
Adjustments section of Chapter 5 -- Electrical System).
15.Secure switch shield (item 50) to center deck.