


Greensmaster 3320/3420 Hydraulic SystemPage 5 -- 87
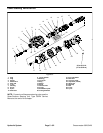
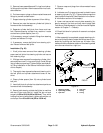
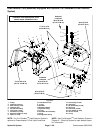
Disassembly (Fig. 58)
1. Pump oil out of cylinder into a drain pan by slowly
moving shaft in and out of cylinder bore. Plug ports and
clean outside of cylinder.
IMPORTANT: To prevent damage when clamping
cylinder barrel in a vise, clamp only on ball joint
location. Do not clamp the vise jawsagainst the cyl-
inder barrel or shaft surface.
2. Mount cylinder in a vise by clamping vise on barrel
ball joint location of cylinder. Use of a vise with soft jaws
is recommended.
3. Using a pipe wrench, carefully remove both collars
(item 2) from cylinder barrel.
4. Carefully remove non--ball joint end head (item 13)
from end of barrel.
5. Graspend ofshaft and useatwisting andpulling mo-
tion to carefully extract shaft assembly (with collar, ball
joint e nd head and piston) from cylinder barrel.
6. Remove wear ring from piston to allow access to
dowel pin (item 9) that secures piston to shaft.
7. Usepressto carefullyremove dowelpin(item9) from
piston and shaft.
8. Slidepiston(item 1 0),ball jointend head(item 3)and
collar (item 2) from shaft.
9. Remove and discard seals, back--up rings, wear
rings and O--rings from piston and both heads.
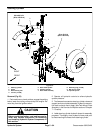
CAUTION
Use eyeprotection such asgoggles when using
compressed air to dry cylinder parts.
10.Wash cylinder parts in clean solvent. Dry parts with
compressedair.Donotwipepartsdry withpaperor cloth
towels. Lint from towels in a hydraulic system will cause
damage.
11.Carefully inspect internal surface of barrel for dam-
age (deep scratches, out--of--round, etc). Inspect shaft,
both heads and piston for evidence of excessive scor-
ing, pitting or wear. Replace entire steering cylinder if in-
ternal components are damaged.
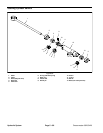
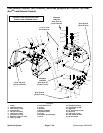
Assembly (Fig. 58)
1. Put a coating of clean hydraulic oil on all new seals,
back--up rings, wear rings and O--rings.
2. Install new shaft seal, dustseal, back up ring andO--
ring onto both heads (items 3 and 13).
3. Install piston seal and O--ring to the piston (item 10).
Also, install one (1) wear ring onto piston in groove that
does not contain hole for dowel pin. Second wear ring
will be installed after piston is secured to shaft.
4. Carefully slide collar (item 2), ball joint end head
(item 3), second piston wear ring and piston (item 10)
onto shaft taking care t o not damage seals. Make sure
that hole in piston for dowel pin is orientated toward ball
joint end of shaft.
5. Align holes in piston and shaft. Use press to install
dowel pin (item 9) into piston and shaft. Make sure that
dowel pin ends do not extend into the piston wear ring
location.
6. Install second wear ring into piston groove that con-
tains hole for dowel pin.
7. Coat all internal cylinder parts with a light coat of
clean hydraulic oil. Carefully slide shaft assembly (with
collar, ball joint end head and piston) into the barrel be-
ing careful to not damage seals.
8. Lubricate non--ball joint end head (item 13) assem-
bly with clean hydraulic oil and carefully slide it onto
shaft and into barrel.
9. Using a pipe wrench, install collars to secure b oth
heads in cylinder barrel.
Hydraulic
System