


Groundsmaster 4500--D/4700--D Hydraulic SystemPage 4 -- 135
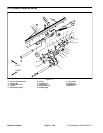
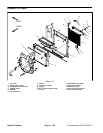
Removal (Fig. 112)
1. Park machine on a level surface, lower cutting
decks, stop engine, engage parking brake and remove
key from the ignition switch.
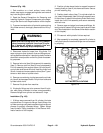
2. Read the General Precautions for Removing and
Installing Hydraulic System Components at the begin-
ning of the Service and Repairs section of this chapter.
3. Toprevent contamination ofhydraulic system during
hydraulicreservoir removal,thoroughlyc lean exteriorof
reservoir.
4. Disconnectoneofthehydraulictubesfromtheteefit-
ting on bottom of reservoir to allow draining of reservoir.
Drain reservoir into a suitable container.
5. Disconnect remaining hydraulic hoses from reser-
voir. Label the hydraulic hoses to show their correct
position on the reservoir for assembly purposes.
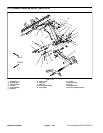
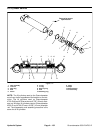
6. Remove hydraulic reservoir using Figure 112 as a
guide.
7. If hydraulic fittings are to be removed from reservoir,
mark fitting orientation to allow correct assembly. Re-
move fittings from reservoir and discard O--rings.
Inspection
1. Clean hydraulic reservoir and suction strainer with
solvent.
2. Inspect reservoir for leaks, cracks or other damage.
Installation (Fig. 112)
1. If fittings were removed from reservoir, lubricate and
place newO--r ings ontofittings. Installfittings intoreser-
voir openings using marks made during the removal
process to properly orientate fittings. Torque fittings to
values identified in Figure 112.
2. Install reservoir using Figure 112 as a guide.
IMPORTANT: When tightening hoses to reservoir
fittings, hold fitting with wrench to prevent over--
tightening off itting and potential reservoirdamage.
3. Connect hydraulic hoses to reservoir fittings (see
Hydraulic Hose and Tube Installation in the General In-
formation section of this chapter).
4. Fill reservoir with hydraulic fluid to proper level.
Hydraulic
System