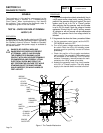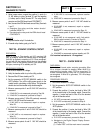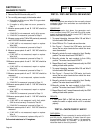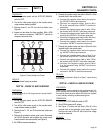
4. Using jumper wires, connect the positive (+) post of a
12 volt battery to relay Terminal “A” and the negative
(-) battery post to Relay Terminal “B”. The relay should
energize and the VOM should read CONTINUITY.
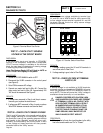
5. Now, connect the VOM test leads across Relay Terminals
1 and 7.
a. Energize the relay and the meter should
indicate INFINITY.
b. De-energize the relay and the VOM should read
CONTINUITY.
RESULTS:
1. Replace transfer relay if it is defective.
2. If transfer relay checks good go to Test 31.
TEST 30 – STANDBY CONTROL CIRCUIT
DISCUSSION:
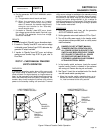
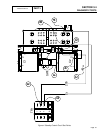
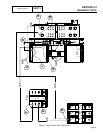
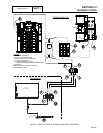
Refer to Figure 4. The standby coil (C2) requires 240
VAC to energize. When the transfer relay is energized,
240 VAC is applied to standby coil C2. Once energized,
the coil will pull the transfer switch down to the standby
position. Once in the standby position, limit switch SW3
will open, removing AC to standby coil C2.
PROCEDURE/ RESULTS:
1. Set VOM to measure AC voltage.
2. Verify the transfer switch is up in the utility position.
3. Remove Wire E2 from standby coil C2.
4. Set the generator AUTO-OFF-MANUAL switch in the
AUTO position. Turn off the utility power supply to the
transfer switch, simulating a utility failure. The generator
should start and the transfer relay should energize.
5. Measure across points A and B. 240 VAC should be
measured.
a. If 240 VAC is not measured go back to Test 26.
b. If 240 VAC is measured, proceed to Step 6.
6. Measure across points C (Wire E2 previously removed)
and B. 240 VAC should be measured.
a. If 240 VAC is not measured, repair or replace
Wire E2.
b. If 240 VAC is measured, proceed to Step 7.
7. Measure across points A and D. 240 VAC should be
measured.
a. If 240 VAC is not measured, repair or replace
Wire E1.
b. If 240 VAC is measured, proceed to Step 8.
8. Measure across points A and E. 240 VAC should be
measured.
a. If 240 VAC is not measured, replace transfer
relay.
b. If 240 VAC is measured, proceed to Step 9.
9. Measure across points A and F. 240 VAC should be
measured.
a. If 240 VAC is not measured, repair or replace
Wire 205.
b. If 240 VAC is measured, proceed to Step 10.
10. Measure across points A and G. 240 VAC should be
measured.
a. If 240 VAC is not measured, verify limit switch
SW3 is wired correctly. Proceed to Test 33.
b. If 240 VAC is measured, proceed to Step 11.
11. Measure across points A and H. 240 VAC should be
measured.
a. If 240 VAC is not measured, repair or replace
Wire B.
b. If 240VAC is measured, replace standby coil C2.
Coil nominal resistance is 1-2 megohms.
TEST 31 – CHECK WIRE 23
DISCUSSION:
Printed circuit board action controls grounding Wire
23 to initiate a transfer to standby. When Wire 23 is
grounded the transfer relay (TR1) is energized. To
initiate a transfer back to utility the TR1 relay must be
de-energized. If Wire 23 is grounded, TR1 will always
be energized.
PROCEDURE/ RESULTS:
1. Set VOM to measure DC voltage.
2. Set the generator AUTO-OFF-MANUAL switch in the
OFF position.
3. Connect the positive (+) meter test lead to Wire 15B
at the terminal strip in the transfer switch. Connect the
negative (-) meter test lead to Wire 23 at the terminal
strip in the transfer switch.
a. If 0 VDC is measured, proceed to Step 4.
b. If 12 VDC is measured, proceed to Step 6.
4. Set the generator AUTO-OFF-MANUAL switch in the
AUTO position.
5. Connect the positive (+) meter test lead to Wire 15B
at the terminal strip in the transfer switch. Connect the
negative (-) meter test lead to Wire 23 at the terminal
strip in the transfer switch
a. If 12 VDC is measured, procced to Step b.
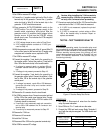
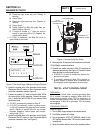
b. Navigate to the Digital Output Display Screen
(see Figure 5).
(1) Press “ESC” until the main menu is reached.
Page 78
PART 3
TRANSFER SWITCH
SECTION 3.4
DIAGNOSTIC TESTS


