


114
Chapter 6: Replacing Assemblies
1680A,AD-series disassembly/assembly
1680A,AD-series disassembly/assembly
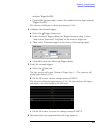
Prepare the instrument for disassembly
Do this procedure before doing any disassembly procedure on the instrument.
1 Close the Agilent Logic Analyzer application software.
2 Gracefully shut down the operating system and remove power when
shutdown is complete.
3 Remove the power cord.
4 Move the instrument to a static safe work environment.
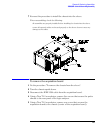
To remove the chassis from the sleeve
Before disassembling the instrument, it must be turned off and placed in a static
safe work environment. If you haven't already done so, do the previous procedure
"Prepare the instrument for disassembly."
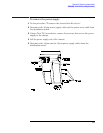
1 Using a Torx T-15 screwdriver, remove the two screws that secure the
handle to the side of the instrument and lift off the handle.
2 Using a Torx T-10 screwdriver, remove five screws that secure the logic
analyzer cables to the rear panel of the logic analyzer.
3 Disconnect the logic analyzer cables from the rear panel. Remove the logic
analyzer cables (and spacers, if installed) from the logic analyzer.
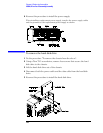
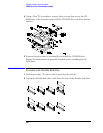
4 Using a Torx T-15 screwdriver, remove the screws connecting the four rear
feet to the instrument, one screw per foot. Remove each foot from the rear
panel.
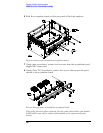
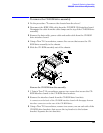
5 Using a Torx T-10 screwdriver, remove eleven screws that secure the
sleeve to the chassis.
6 With the logic analyzer upright, slide the chassis out of the sleeve.