


80 Creating boot disks with the Ghost Boot Wizard
Creating boot disks and boot images
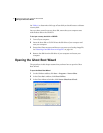
5 Select one of the following:
■ Use PC-DOS: Includes PC-DOS on the boot disk.
■ Use MS-DOS: Includes MS-DOS on the boot disk.
See “Providing MS-DOS” on page 89.
6 In the Ghost.exe field, type the correct path if the executable has been moved
or you want to use a different version of Ghost.
The default path to the Norton Ghost executable appears in the Ghost.exe
field.
7 In the Parameters field, type any required command-line parameters.
See “Adding command-line parameters to a boot package” on page 88.
8 Click Next.
9 Do one of the following:
■ Click DHCP will assign the IP settings if your network contains a
DHCP server.
■ Click The IP settings will be statically defined and complete the fields
below this option if your network does not contain a DHCP server.
If you create more than one boot disk, then the static IP address
incrementally increases as each boot disk is created.
10 Click Next.
11 In the Floppy Disk Drive field, select the appropriate drive letter.
12 In the Number of disks to create field, select the number of disks that you
want to create.
13 Ensure that Format disk(s) first is checked to format the disks before disk
creation.
Ensure that this option is checked unless you are creating a custom boot disk
with custom system files. If this option is unchecked, the boot disk is not
bootable.
14 Ensure that Quick Format is checked to perform a quick format.
15 Click Next.
16 Review the boot disk details and click Next to start creating the boot disks.
Follow the prompts to format the disks and create a boot disk set.