


Groundsmaster 4000--D/4010--DPage 6 -- 8Axles, Planetaries and Brakes
2. Apply gasket sealant to sealing surfaces of new gas-
ket (item 18). Apply gasket to brake assembly.
3. Install brake assembly onto machine, aligning
splined brake shaft with input shaft on planetary wheel
drive. Make sure that brake pull rod is orientated toward
rear of machine.
4. Secure brake assembly to planetary assembly with
four (4) flange head screws (item 16). Tighten screws in
acrossingpatterntoatorquefrom75 to 85 ft--lb (101
to 115 N--m).
5. Securehex onend of brakecableto pullrod onbrake
assembly. Brake cable end should be completely
threaded onto pull rod before tightening jam nut.
6. Install new O--ring on hydraulic wheel motor. Install
wheel motor and torque cap screws from 75 to 85 ft--lb
(101 to 115 N--m).
7. Install wheel assembly.
NOTE: While front wheel is off the ground, check plan-
etary wheel drive assembly for endplay (see Planetary
Wheel Drive Assembly Endplay in the Adjustments sec-
tion of this chapter).
WARNING
Failure to maintain proper wheel lug nut torque
could result in failure or loss of wheel and may
result in personal i njury.
8. Lower machine to ground. Torque lug nuts from 85
to100ft--lb(115to135N--m).
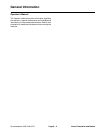
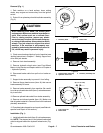
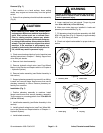
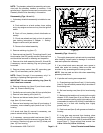
9. Make sure drain plugs are installed in brake and
planetary drive assemblies (Fig. 2).
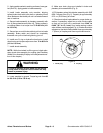
10.Fill planetary wheel drive/brake assembly with SAE
85W--140 gear lube (Fig. 5). Capacity is approximately
22 fl. oz. (0.65 liters) per wheel.
11.Check and adjust brake cables for proper brake op-
eration. If necessary, adjust hex on end of brake cable
so that pull rod jam nut is positioned from 0.340” to
0.400” (8.7 to 10.1 mm) from brake casting surface
when brakes are disengaged (Fig. 4). Brakes should be
adjusted so that both brake pedals have approximately
1” (25mm) of freeplay and have equal brake tension.
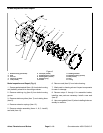
1. Check plug 2. Fill plug
Figure 5
1
2