


9 Security Settings
XPort Pro™ User Guide 85
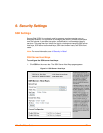
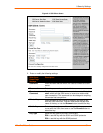
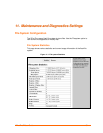
SSL Page
Settings
Description
add comments before and/or after these lines. Those
need to be deleted before upload.
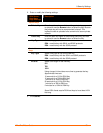
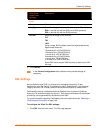
New Private Key
Enter the path and name of the private key you want to
upload, or use the Browse button to select the private
key. The key needs to belong to the certificate entered
above.
The format of the file must be PEM. The file must start
with “-----BEGIN RSA PRIVATE KEY-----” and end with “-
----END RSA PRIVATE KEY-----”. Read DSA instead of
RSA in case of a DSA key. Some Certificate Authorities
add comments before and/or after these lines. Those
need to be deleted before upload.
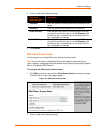
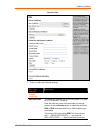
Upload Authority
Certificate
Authority
One or more authority certificates are needed to verify a
peer's identity. It is used for SSL Tunneling. These
certificates do not require a private key.
Enter the path and name of the certificate you want to
upload, or use the Browse button to select the certificate.
RSA or DSA certificates with 512 to 1024 bit public keys
are allowed.
The format of the file must be PEM. The file must start
with “-----BEGIN CERTIFICATE-----” and end with “-----
END CERTIFICATE-----”. Some Certificate Authorities
add comments before and/or after these lines. Those
need to be deleted before upload.
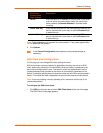
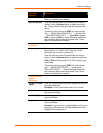
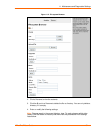
Create New Self-
Signed
Certificate
Country (2 Letter
Code)
Enter the 2-letter country code to be assigned to the new
self-signed certificate.
Examples: US for United States and CA for Canada
State/Province
Enter the state or province to be assigned to the new
self-signed certificate.
Locality (City)
Enter the city or locality to be assigned to the new self-
signed certificate.
Organization
Enter the organization to be associated with the new self-
signed certificate.
Example: If your company is called Widgets, and you are
setting up a web server for the Sales department, enter
Widgets for the organization.