


Fault Repair and Commissioning Hydrastep Pressure Parts
3-6 24675030
f) Refit the electrical lead(s) and guard. Recommission as detailed later in this Chapter.
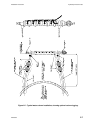
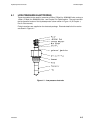
3.1.5 PROCEDURE FOR CHANGING HIGH PRESSURE ELECTRODES
Carry out the isolation procedure as detailed in sub-section 3.1.2. Ensure that the tripping is
disabled (see ‘Safety Precautions’, sub-section 3.1.1). There is no need to switch off the
Hydrastep electronic equipment; allow system about 20 minutes to cool down, then:
a) Remove the electrode cover guard, taking care to avoid knocking the electrodes.
Note: Remove only one electrode at a time (avoids risk of incorrect reconnection)
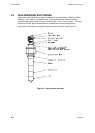
b) Disconnect the leads, extract the electrode carefully without damage to the seat face.
c) Inspect the column seat, remove any scaling or residue taking care not to damage the seat.
d) Carefully unpack the new electrode and check that there is no damage to the ceramic
insulators or to the seating ferrules.
e) Lightly coat the electrode threads with anti-seize compound (Part No.: 830007220) and
assemble the new electrode to the water column as detailed in sub-section 3.1.3 for
high pressure electrodes.
Note: At the first pressure/temperature test, check for leaks and tighten electrode nut as
necessary, but not exceeding ¼ turn from the ‘nipped electrode’ condition.
f) Refit the electrical lead(s) and guard. Recommission as stated in section 3.2.
3.2 WATER COLUMN COMMISSIONING OR RECOMMISSIONING
The method given allows the column to fill slowly with condensate from the steam leg
through a ‘cracked’ steam valve and for subsequent warming to continue at a controlled rate
as the water is forced back through the ‘cracked’ water valve.
Caution: DO NOT BLOW WATER COLUMN DOWN
a) Notify the unit operator of the intention to commission the column, in accordance with
recognised procedures.
b) Check that the electrode guard is in place.
c) Close the drain valves.
d) Crack open the steam valve. Check with the display or the unit operator that the column
fills with condensate slowly (10 to 15 minutes).
e) Crack open the water isolating valve. Check with the unit operator that the water level is
falling (1 to 2 minutes) to approximately normal water level and allow to stabilise and
heat up for 15 minutes.
f) Open the water valve fully.
g) Open the steam valve fully.
3.2.1 VENT AND DRAIN VALVE REPAIRS
These will usually involve replacement of the gland packing or regrinding of the seat, and
should follow the normal practice for the particular valve types concerned. If it is necessary
to replace an entire valve, ensure that the new valve is correctly orientated for its sealing
direction.