


Hydrastep Pressure Parts Fault Repair and Commissioning
24675030 3-5
Where scoring or erosion of the electrode port seat has occurred in the water column, the
seat can be re-cut to acceptable standards using a service tool as listed below.
Service Tool 246791AA – for use with electrodes 246781A* and 246781Z* only
Service Tool 246722AA – for use with electrode 246782A* only
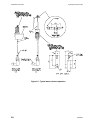
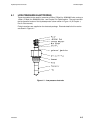
3.1.3.2 High Pressure Electrodes
In the case of high pressure electrodes, sealing is performed by a taper form on the
electrode body. The act of tightening the electrode clamping nut compresses the taper form
into the port sealing taper, thereby effecting a pressure seal. For these electrodes, the
condition of the electrode port sealing surface is of great importance, and the tightening
procedure is given to prevent damage to the electrode or the water column electrode port.
Should a leak develop, the electrode must be removed and both the port and taper seating
surfaces examined for signs of surface deterioration.
3.1.3.3 Tightening Procedure For High Pressure Electrode Installation
a) Ensure the electrode is clean and the electrode port bore is clean and free of debris.
b) Lightly coat the column port thread with anti-seize compound (Part No.: 830007220).
c) Assemble the electrode to the column port and tighten the electrode nut until the
electrode will not rotate in its seat.
d) Finally, tighten the electrode nut a further
1
/
8
to ¼ turn to complete the procedure.
NOTE: The final
1
/
8
to ¼ turn corresponds to a torque level of between 28lbft (35Nm)
and 47lbft (60Nm).
1
/
8
turn is the recommended tightening condition. ¼ turn is the
maximum allowable, and the tightening torque used must be the minimum to achieve
this. Failure to comply with this limitation may cause damage to the port or to the
electrode, due to over tightening.
If necessary, where the sealing surfaces can be recovered by simple cleaning practices, the
old electrode can be refitted and tightened to within the maximum torque value given and the
system pressure tested. However, it is recommended that the best solution to minimise the
system ‘down time’ is to fit a new electrode.
Where scoring or erosion of the sealing seat has occurred in the water column port, this can be
re-cut to acceptable standards using the Service Tool 246791AA or 246722AA (see above).
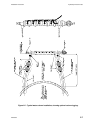
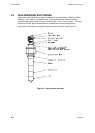
3.1.4 PROCEDURE FOR CHANGING THE LOW PRESSURE ELECTRODES
AND GASKETS
Carry out the isolation procedure as detailed in sub-section 3.1.2. Ensure that the tripping is
disabled (see ‘Safety Precautions, sub-section 3.1.1). There is no need to switch off the
Hydrastep electronic equipment; then:
a) Remove the electrode cover guard, taking care to avoid knocking the electrodes.
Note: Remove only one electrode at a time (avoids risk of incorrect reconnection).
b) Disconnect the leads, extract the electrode and the gasket carefully without damage to
the seat face.
c) Inspect the column seat, making sure that it is free of loose particles and is not pitted or
corroded.
d) Carefully unpack the new electrode and check that there is no damage to the ceramic
insulators or to the sealing gasket.
e) Assemble the new electrode to the water column as detailed in sub-paragraph 3.1.3 for
low pressure electrodes, paragraph d.