


Fault Repair and Commissioning Hydrastep Pressure Parts
3-4 24675030
3.1.2 WATER COLUMN ISOLATION
After obtaining authority to isolate the column:
a) Close off the steam and water isolating valves.
b) Where the column is connected to a closed drain, open the drain valve and, when the
pressure equalises, close the drain valve.
c) Check for no-pressure condition of water column. A failure to cool and a re-filling of the
water column would indicate a pressure condition. Alternatively, carefully unscrew the
first electrode and look out for the presence of steam.
Warning: Great care is required during the check on the first electrode.
Where a separate atmospheric drain is used, open the drain valve and leave it open.
d) Proceed with the work required.
3.1.3 ELECTRODE AND ELECTRODE SEAL LEAKS
The distinction between electrode/insert seal and electrode/insulator leaks is often difficult to
determine prior to removal of the electrode, unless the leak is small. Steam wisps which
appear to come from between the outside of the electrode body and the gasket indicate a
seal leak, steam appearing through the external ceramic insulator suggests that the
electrode itself is faulty. Even if the electrode is in water, the water temperature in an
operating system will cause the water to flash off to steam as atmospheric conditions are
reached.
Caution: Do not attempt to cure a leaking seal on a low pressure electrode by
overtightening the electrode clamping nut. The most probable fault for low
pressure electrodes lies in damage to the sealing washer. The correct degree
of compression on this washer is inherent in its design. Tightening beyond this
point will only cause damage to the electrode or to the water column.
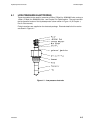
3.1.3.1 Low Pressure Electrodes
The correct procedure on low pressure electrodes for repairing either a seal or an electrode
failure is to remove the knurled nut(s) and disconnect the electrode lead(s). Next, remove
the electrode complete with its sealing washer from the column. A thorough examination of
the electrode and washer is likely to give a more positive identification of the cause of the
leak. However, unless it can be definitely established that the electrode was not at fault, it is
advisable to fit a new electrode at this stage. To assist in identifying a seal leak, this may be
caused by:
a) Failure to remove the old washer on a previous occasion before inserting the
replacement washer and electrode.
b) Re-using an old and already compressed washer instead of a new one.
c) Failing to ensure that the land and the recess in the electrode port were clean and
undistorted at the last inspection.
Note: When installing low pressure electrodes, ensure that the threads in the electrode port
are free of loose particles. Lightly coat the electrode threads with anti-seize
compound (Part No. 830007220). Insert the electrode, ensuring that the new gasket
is centred in the electrode groove, and tighten the electrode with a torque wrench to
40 lbft (55Nm). After 15 minutes, re-tighten the electrode with the torque wrench set
to 40 lbft (55Nm). The maximum torque is 50 lbft (68Nm) so
DO NOT OVERTIGHTEN.