


176
MU128 Plug-in System
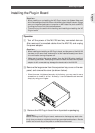
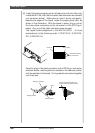
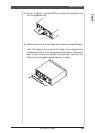
Installing the Plug-in Board
Before Installing the Plug-in Board
Here are some things you should know about the XG Plug-in boards
before you install and use them.
In general:
• The XG Plug-in board can be used only when the Sound Module
mode is set to “XG” or “PFM” (Performance).
• Tone generator type Plug-in boards (such as the PLG100-VL and
PLG100-DX) can be used only for Parts 1 - 16. Set the MIDI
receive channel to A01 - A16. (No sound is output when setting to
B01 - D16.)
• In order to control the XG Plug-in board from the external MIDI
device, use the MIDI IN-A terminal when the HOST SELECT
switch is set to “MIDI,” or use port 1 (A01 - A16) when the HOST
SELECT switch is at a setting other than “MIDI.”
• Voices on the Plug-in board can be selected in the normal way.
However, first you will need to:
1) Set the Part Assign parameter (so that the board is assigned to
the desired Part).
2) Select the desired Part with the [PART -/+] buttons.
3) Select the desired board by pressing the [SELECT] button.
(page 182.)
• XG Part parameters of the Plug-in board can be set from the Multi
Edit mode. However, some parameters may not be available on
certain boards. Refer to the owner’s manual of the particular Plug-
in board for details.
• When a Plug-in board is installed, the parameters of the board that
can be set from the panel of the MU128 can also transmitted to an
external MIDI device.
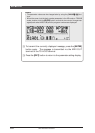
Data Backup:
• The XG Plug-in boards themselves do not have any data backup
function. However, the MU128 saves any parameter edits made
to an installed XG Plug-in board from the panel of the MU128,
and this backup data is sent to the Plug-in board whenever the
power is turned on.
• It takes a small amount of time for the MU128 to execute the
backup function when editing parameter values of the board (which
can normally be edited from the panel) from an external MIDI
device. If you edit parameters via MIDI, make sure to wait a short
About Plug-in System