


16
MU128of the MU90R
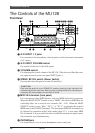
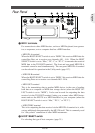
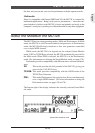
The Controls of the MU128
Hint
You can rapidly move through the values by holding down one of the [VALUE
-
/
+
]
buttons. You can move even more rapidly by holding down one button and then press-
ing and holding down the other. For example, to rapidly advance (increase) the value,
hold down the [VALUE
+
] button and simultaneously press and hold down the [VALUE
-
] button.
J Data dial
For rapidly adjusting/changing values of the selected function or parameter.
Rotate this clockwise to increase the value.
K SELECT button
For switching among the internal Voices of the MU128 and the Voices of any
installed optional XG Plug-in boards (page 174). (This applies to tone genera-
tor type boards only; effect type boards are selected by a different method.)
Press this repeatedly to select the desired board and its Voices. The appropri-
ate LED flashes briefly and the corresponding icon for the board appears in the
LCD. (This button has no effect unless a tone generator type plug-in board is
installed.) (page 178.)
L PART GROUP button
For switching among the Part groups. Press this repeatedly to select the de-
sired Part group (A, B, C, or D).
M Display
This back-lit LCD displays all necessary operation information for the MU128.
N LEDs
These indicate how many plug-in boards are installed. The MU LED indicates
the MU128 itself and its built-in Voices and remains lit. PLG-1, PLG-2, and
PLG-3 are lit according to the number of XG Plug-in boards installed. When
using the SELECT button to select a board, the corresponding LED flashes
briefly.
During playback of song data (from a sequencer, etc.), these flash to indicate
usage of the various sound sources.