


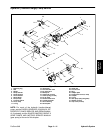


Hydraulic Manifold Service
1. Make sure the manifold is clean before removing any
cartridge valve.
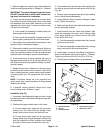
2. If solenoid cartridge is being serviced, remove nut
securing solenoid to the cartridge valve. Carefully slide
solenoid off the valve.
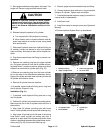
CAUTION
sure in the General Information section of this
Operate all hydraulic controls to relieve system
pressure and avoid injury from pressurized hy-
draulic oil. See Relieving Hydraulic System Pres-
chapter.
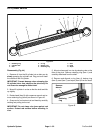
IMPORTANT: Use care when handling the cartridge
valve. Slight bending or distortion of the stem tube
can cause binding and malfunction.
3. Remove cartridge valve with a deep socket wrench.
Note correct location for o–rings, sealing rings and
backup rings. Remove and discard seal kit from valve.
4. Visually inspect the manifold port for damage to the
sealing surfaces, damaged threads and contamination.
5. Visually inspect cartridge valve for damaged sealing
surfaces and contamination.
A. Contamination may cause valves to stick or hang
up. Contamination can become lodged in small valve
orifices or seal areas causing malfunction.
B. If valve sealing surfaces appear pitted or dam-
aged, the hydraulic system may be overheating or
there may be water in the system.
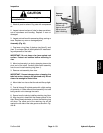
CAUTION
Abrupt movement of internal spools can cause
stored fluid to be released suddenly.
6. Clean cartridge valve by submerging valve in clean
mineral spirits to flush out contamination. Particles as
fine as talcum powder can affect the operation of high
pressure hydraulic valves. If cartridge design allows,
use a wood or plastic probe to push the internal spool in
and out 20 to 30 times to flush out contamination. Be ex-
tremely careful not to damage cartridge. Use com-
pressed air for cleaning.
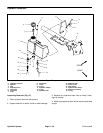
7. Reinstall the cartridge valve:
A. Lubricate new seal kit components with clean hy-
draulic oil and install on valve. The o–rings, sealing
rings and backup rings must be arranged properly on
the cartridge valve for proper operation and sealing.
IMPORTANT: Use care when handling the valve
cartridge. Slight bending or distortion of the
stem tube can cause binding and malfunction.
B. Thread cartridge valve carefully into correct man-
ifold port. The valve should go in easily without bind-
ing.
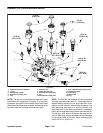
C. Torque cartridge valve using a deep socket to val-
ues identified in Figure 40.
8. If solenoid cartridge was removed, carefully install
solenoid coil onto the cartridge valve. Install nut and
torque nut to 5 ft–lb (6.8 N–m).
9. After assembly, if problems still exist, remove valve
and clean again or replace valve.
Hydraulic
System
CAUTION
Use eye protection such as goggles when using
compressed air for cartridge valve cleaning.
ProCore 648 Page 4 – 49 Hydraulic System