


Front Panel Operations
Additional Features
2
2-31
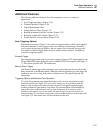
Additional Features
The following additional features allow the instrument to serve in a variety of
applications:
• Scan Triggering Options (Figure 2-19)
• Totalizer Operation (Figure 2-20)
• Digital Input/Output Lines
• Setting Date and Time (Figure 2-21)
• Reading Instrument Software Versions (Figure 2-22)
• Returning to the LOCAL Mode (Figure 2-23)
• Front Panel Key Lockout Option (Figure 2-24)
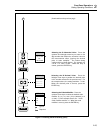
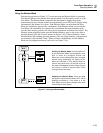
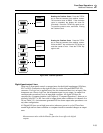
Scan Triggering Options
Perform the procedure in Figure 2-19 to select a triggering option, which can be applied
when the instrument is in the inactive mode (not scanning or monitoring). Normally, a
scan is started by pressing the Q key, but two options can be selected to start a scan
from either an external trigger input or from a monitor-alarm condition. The Q key
overrides a triggering option.
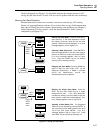
External Trigger
The external trigger input starts a scan from a contact closure or TTL input applied to the
TR and GROUND inputs on the rear panel ALARM OUTPUTS connector (see Figure 1-
7). This option lights the EXT TR annunciator.
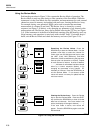
Monitor-Alarm Trigger
The Monitor-Alarm trigger starts scanning from a channel that goes into an alarm while
being monitored in the Monitor Mode. When the monitored channel goes into alarm, the
instrument scans for as long as the alarm condition exists. This option lights the TR
annunciator.
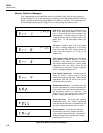
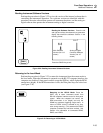
Triggering Options and Memory Card Operation
To verify the equipment setup when the memory card is used to record data, use the
Single Scan mode (see Figure 2-15) to record a single scan. Any problems with the
memory card or setup can be observed and corrected. If a triggering option triggers
scanning without an open memory card dAtxx file, the instrument will automatically
open a file when a usable memory card is in the instrument. If no memory card is
installed or the memory card is not usable, the most recent 75 scans are saved in an
internal memory. To record the saved scans, insert a usable memory card and open a file
(see Figure 3-8). The stored scans will be transferred to the card.