


Chapter 6: Replacing Assemblies
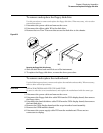
To remove and replace the fan
6–25
To remove and replace the fan
WARNING AVOID INJURY!
The fan blades are exposed both inside and outside the chassis. Disconnect the power cable
before working around the fan. Use extreme caution in working with the instrument. Failure to
observe these precautions may result in injury.
Use this procedure to remove and replace the fan. When necessary, refer to other removal
procedures.
1
Disconnect the power cable and remove the cover.
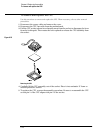
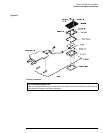
2 Disconnect the fan cable W21 from the acquisition board.
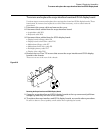
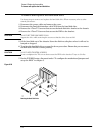
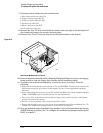
3 Remove the four fasteners securing the fan to the chassis.
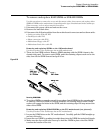
To remove a fastener, unscrew the center pin using a #1 Posidrive screwdriver. You may need
to apply upward pressure at the point of the pin with a small screwdriver. After removing the
center pin, compress the fastener body and push it up and out of the fan and chassis. Be sure to
support the fan before removing the last fastener.
Alternatively, you can cut the fastener at the outside of the chassis with a pair of diagonal cutters,
then install new fasteners when you replace the fan.
Figure 6-24
Removing Fan Fasteners
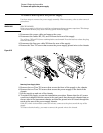
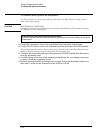
CAUTION AVOID OVERHEATING THE INSTRUMENT!
When replacing the fan, be sure the direction of the fan air flow is coming from the outside to
the inside of the instrument. Check the flow arrows on the fan and check for proper flow once
power is applied to the instrument. Improper air flow can overheat the instrument.
4
To install the fan, reverse this procedure.