


Inspecting and Sharpening Blade
1. Lock transport levers, raise cutting unit to highest
position, shut the engine off and engage the parking
brake.
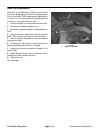
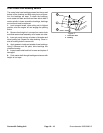
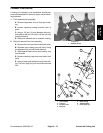
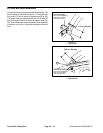
2. Examine cutting ends of the blade carefully, espe-
cially where the flat and curved parts of the blade meet
(Fig. 21–A). Since sand and abrasive material can wear
away the metal that connects the flat and curved parts of
the blade, check the blade before using the machine. If
wear is noticed (Fig. 21–B), replace the blade: refer to
Removing Cutter Blade.
DANGER
between the sail and flat part of the blade
If blade is allowed to wear, a slot will form
(Fig. 21–C). Eventually a piece of the blade
may break off and be thrown from under the
housing, possibly resulting in serious injury to
yourself or bystander.
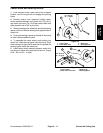
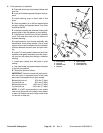
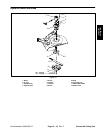
3. Inspect cutting edges of all blades. Sharpen the cut-
ting edges if they are dull or nicked. Sharpen only the top
of the cutting edge and maintain the original cutting
angle for best performance (Fig. 22). The blade will re-
main balanced if same amount of metal is removed from
both cutting edges.
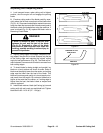
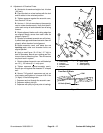
4. To check blade for being straight and parallel, lay
blade on a level surface and check its ends. Ends of
blade must be slightly lower than the center, and cutting
edge must be lower than the heel of the blade. This
blade will produce good quality of cut and require mini-
mal power from the engine. By contrast a blade that is
higher at the ends than the center, or if cutting edge is
higher than the heel, the blade is bent or warped and
must be replaced.
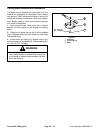
5. Install blade retainer, blade (sail facing (up) toward
cutting unit) with anti–scalp cup and blade bolt. Tighten
blade bolt to 85–110 ft–lb (12 – 15 Kgm).
Figure 21
END VIEW
SHARPEN AT THIS
ANGLE ONLY
Figure 22
Contour 82
Cutting Unit
Groundsmaster 3000/3000–D
Page 10 – 13
Contour 82 Cutting Unit