


Workman e2050/e2065 Page 5 – 9 Chassis (Rev. B)
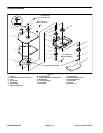
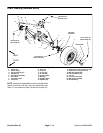
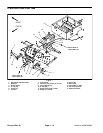
Disassembly (Fig. 2)
IMPORTANT:Do not reuse flange head screw with
patch lock (item 9) after it has been removed.
1. Remove flange head screw with patch lock (item 9)
and stepped washer (item 8) from Pitman arm. Discard
flange head screw.
2. Remove cap screw (item 13) and flat washer (item
12) from pinion gear shaft.
3. Remove four (4) hex washer head screws (item 2)
securing the housing cover and gasket to the steering
housing. Remove cover and gasket from the housing.
Replace gasket if damaged.
4. Inspect gears. Sector and pinion gear teeth must be
free of damage that prevents them of free movement.
5. Remove pinion gear (item 17) from the housing.
IMPORTANT:Note alignment marks on Pitman arm
shaft and sector gear. If marks are not visible,
matchmark shaft and gear before disassembly.
Their position is critical during assembly.
6. Separate Pitman arm (item 19) from the sector gear
(item 4) and steering housing. Remove Pitman arm from
the housing.
7. Inspect bearings. Bearings must spin smoothly and
be free of damage. Press bearings and spacer out of
housing if necessary.
NOTE: If seals are removed, note orientation of seal
lips for installation purposes.
8. Inspect seals. Seals must be free of rips and tears.
Replace seals if necessary.
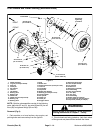
Assembly (Fig. 2)
IMPORTANT:Always replace ball bearings as a set.
1. If ball bearings were removed:
A. Press new bearing into housing from the inside
first.
B. Turn housing over. Insert spacer and press new
bearing into housing.
2. If seals (items 3 and 18) were removed, press new
seals into housing. Install seals with seal lips up.
3. Place flat washer onto shaft of the Pitman arm. Insert
shaft into steering housing.
IMPORTANT:The position of the Pitman arm and
sector gear is critical during assembly. If either or
both of these parts is replaced, make sure their
alignment matches the alignment of the original
gear and Pitman arm.
4. Position sector gear onto the spline of the Pitman
arm shaft while aligning marks.
IMPORTANT:Make sure sector gear is centered to
the pinion gear.
5. Insert pinion gear into the small bearing in the steer-
ing housing.
6. Fill steering housing with number 2 general purpose
grease. Make sure all gear teeth on the sector and pin-
ion gears are covered with grease.
7. Place gasket and steering housing cover onto the
housing. Secure cover to housing with four (4) hex
washer head screws. Torque screws from 90 to 110 in–
lb (10.2 to 12.4 N–m).
IMPORTANT:Flange head screw with patch lock
(item 9) should be replaced whenever it is removed.
8. Secure flange head screw with patch lock (item 9)
and step washer (item 8) to the Pitman arm. Make sure
to position step washer as in Figure 2. Torque screw
from 27 to 33 ft–lb (37 to 45 N–m).
9. Secure cap screw (item 13) and flat washer (item 12)
to the pinion gear shaft. Torque cap screw from 175 to
225 in–lb (19.8 to 25.4 N–m).
Chassis