


Workman e2050/e2065Page 5 – 24Chassis (Rev. B)
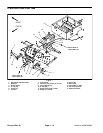
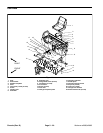
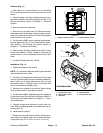
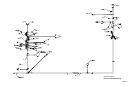
Cargo Bed
1. Cargo bed
2. Striker plate (2 used)
3. Screw (3 per striker plate)
4. Tailgate channel
5. RH latch rod
6. RH latch bracket
7. Grip knob
8. Tailgate
9. LH latch rod
10. Screw (2 per bracket)
11. LH latch bracket
12. Screw (2 per bracket)
13. Spring
14. Flat washer
15. Flange head screw (2 per bracket)
16. Pivot bracket (2 used)
17. Flange head screw (6 used)
18. Box brace (3 used)
19. Flange head screw (5 per brace)
20. LH pivot bracket
21. Flange head screw (2 per bracket)
22. Flange head screw (2 used)
23. Prop rod bracket
24. Flat washer
25. Push nut
26. Latch pin (2 used)
27. Lock nut (2 used)
28. Carriage screw (2 used)
29. Rear frame
30. RH pivot bracket
31. Flange head screw (4 used)
32. Tension spring
33. Latch rod
Figure 16
FRONT
RIGHT
25
23
27
28
24
26
22
21
29
6
3
8
13
4
7
2
1
14
5
9
10
11
12
17
15
16
15
19
20
18
31
32
30
33
100 to 200 in–lb
(11.3 to 22.6 N–m)
35 to 55 in–lb
(4 to 6.2 N–m)
35 to 55 in–lb
(4 to 6.2 N–m)
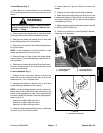
Removal (Fig. 16)
1. Park vehicle on a level surface, turn on/off switch
OFF, set parking brake and remove key from the on/off
switch.
2. Remove two (2) flange head screws (item 21) that
secure RH and LH pivot brackets (items 30 and 20) to
the rear frame.
3. Release latch rod (item 33) from the latch pins (item
26). Remove cargo bed from the frame. Disassemble
cargo bed as necessary using Figure 16 as a guide.
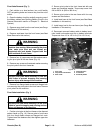
Installation (Fig. 16)
1. Reassemble cargo bed using Figure 16 as a guide.
2. Position cargo bed to the frame locking the latch rod
(item 33) to the latch pins (item 26).
3. Secure both pivot brackets (items 30 and 20) to the
rear frame with flange head screws (item 21).