


Reelmaster 4000–D
Page 4 – 84
Hydraulic System
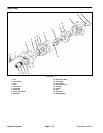
26. Alignment studs can be very helpful in reassembly
of the motor. If you use studs, install 2 studs diagonally
opposed in the bearing housing.
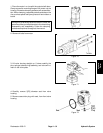
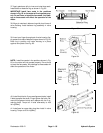
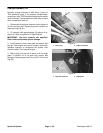
27. Install the shaft face seal in the wear plate as shown
in Fig. 79. Do not distort seal.
28. Install the wear plate, see Fig. 79.
29. Apply a light film of petroleum jelly to the 3[76] diam-
eter seal and install seal in the wear plate.
30. Install the drive into the output shaft.
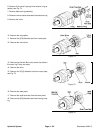
31. Align the notch on the outside of the Geroter with the
notch on the wear plate. Install the Geroter against the
wear plate. Be sure to retain the rollers in the outer ring
if they are loose.
32. Install the valve drive in the Geroter.
NOTE: Installation at this time involves 3 steps in the
timing of the motor. Timing determines the direction of
rotation of the output shaft. Timing parts include:
1. Geroter
2. Valve Drive
3. Valve Plate
4. Valve
Timing Step #1–Locate the largest open pocket in the
Geroter and mark it on the outside edge of the Geroter.
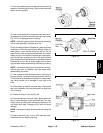
33. Apply a light film of petroleum jelly to the 3[76] diam-
eter seal. Install seal in groove of valve plate.
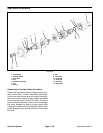
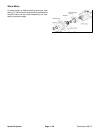
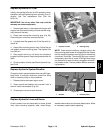
34. Align the notch on the outside of the valve plate with
the notch on the Geroter as shown in Fig. 80.
Timing Step #2–Locate the slot opening in the valve
plate which is in line with the largest open pocket of the
Geroter.
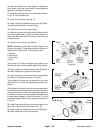
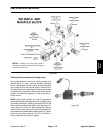
Timing Step #3–Locate any one of the side openings of
the valve and align this opening with the open slot of the
valve plate that is in line with the largest open pocket of
the Geroter. Install the valve by rotating it clockwise until
the spline teeth engage (1/2 spline tooth max). This will
provide the proper rotation when pressurized as shown
in Fig. 81.
35. Install 2 springs and 2 pins in the holes located in the
bore of the valve housing, as shown in Fig. 79.
36. Apply a light film of petroleum jelly to the 3[76] diam-
eter seal. Install seal in the valve housing.
Figure 80
Figure 81
Figure 82