


Rev. A
Workman MD/MDX
Drive Train
Page 5 -- 12
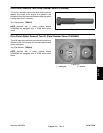
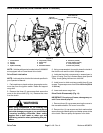
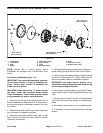
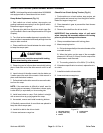
Drive Clutch Service (Serial Number Below 310000000)
1. Fixed sheave
2. Spring
3. Washer
4. Spider assembly
5. Cap screw (3 used)
6. Plastic cap
7. Cover
8. Moveable sheave
9. Roller kit (3 used)
10. Cam weight (3 used)
11. Lock nut (3 used)
12. Pilot bolt (3 used)
Figure 14
v
1
2
3
4
5
6
7
8
9
10
11
12
75 to 100 in--lb
(8.5 to 11.3 N--m)
100 ft--lb
(136 N--m)
NOTE: Vehicles with a serial number below 310000000
are equipped with a Comet brand drive clutch.
Drive Clutch Lubrication
NOTE: Lubricate drive clutch at the interval specified in
your Operator’s Manual.
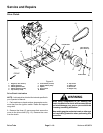
1. Park machine on a level s urface, stop engine and re-
move key from the ignition switch. R aise and support
cargo box.
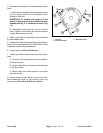
2. Remove the three (3) cap screws that secure the
cover to the drive clutch (Fig. 14). Remove the cover
from the clutch.
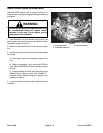
When using c ompressed air for cleaning the
clutch, the dust in the clutch will become airborne
and could damage your eyes or you could inhale
it causing breathing difficulties. Wear safety
goggles and a dust mask or other eye and
respiratory protection when performing this pro-
cedure.
WARNING
3. Using compressed air, thoroughly clean the inside of
the clutch cover and the clutch components.
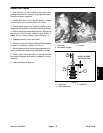
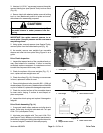
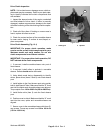
4. Lubricate the clutch components in areas shown in
Figure 15 using Toro Dry Lubricant Spray (see Special
Tools). Avoid getting lubricant on drive belt.
5. Install c over to clutch and secure with three (3) cap
screws. Torque cap screws from 75 to 100 in--lb (8.5 to
11.3 N--m).
6. Lower and secure cargo box.
Drive Clutch Disassembly (Fig. 14)
IMPORTANT: Do not pry off cover, damage may re-
sult. Cover should pop off.
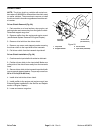
1. Remove three (3) cap screws s ecuring the cover to
the moveable sheave. Pull cover from clutch.
2. Remove four (4) c ap screws and lock washers that
secure the engine starter pulley andstarter s pacer tothe
drive clutch. Remove pulley and spacer from clutch.