


Workman MD/MDX Page 6 -- 19 Electrical System
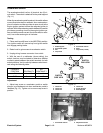
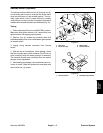
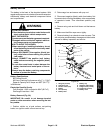
Removal (Fig. 23)
1. Park vehicle on a level surface, stop engine, set
parking brake and remove key from the ignition switch.
2. Raise cargo box and secure with prop rod to gain ac-
cess to the starter/generator.
NOTE: Place all fasteners back onto starter/generator
terminals after disconnecting wires to prevent loss of
fasteners.
3. Label all wires on the starter/generator for assembly
purposes. Disconnect all wires from the starter/genera-
tor.
4. Loosen fasteners that secure starter/generator to
engine tray assembly.
5. Pivot starter/generator and remove drive belt from
the pulley.
6. Support starter/generator to prevent it from shifting
or falling.
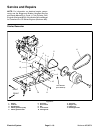
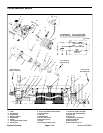
7. Remove lock nut (item 2) and carriage bolt (item 10)
from upper starter/generator flange and bracket on en-
gine tray. Remove flange nut (item 13) and pivot bolt
(item 11) from starter/generator and engine tray.
8. Remove starter/generator from the vehicle.
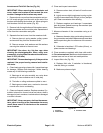
9. If necessary, remove pulley from the starter/genera-
tor shaft:
A. Remove nut and spring washer from the shaft.
Use appropriate puller to remove pulley from the
shaft.
B. Remove woodruff key from the shaft.
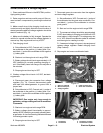
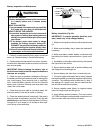
Installation (Fig. 23)
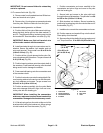
1. If removed, install pulley to the starter/generator
shaft:
A. Position woodruff key to the shaft. Slide pulley
onto the shaft with the larger diameter pulley hub
installed toward starter/generator.
B. Secure pulley to the shaft with spring washer and
nut. Torque nut from 15 to 25 ft--lb (20 to 34 N--m).
2. Position starter/generator to the engine tray assem-
bly.
A. Insert pivot bolt through the starter/generator
front bracket, engine mount and starter/generator
rear bracket. Install flange nut onto the pivot bolt.
B. Tighten flange nut enough so starter/generator
pivots with slight resistance.
C. Install c arriage bolt through upper starter flange
and bracket on engine tray.
D. Thread lock nut onto carriage bolt.
3. Correctly connect all wires to the starter/generator.
4. Install drive belt to the pulley and adjust belt tension.
Make sure that all fasteners are tightened after belt ad-
justment.
5. Lower and secure cargo box.
Electrical
System