


Rev. A
Workman MD/MDX Drive TrainPage 5 -- 11
NOTE: Thedrive clutch on vehicles with serial numbers
above 310000000 is different than the clutch used on
earlier vehicles. The procedure to remove or install the
drive clutch is the same regardless of machine serial
number.
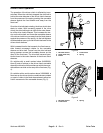
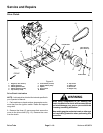
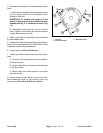
Drive Clutch Removal (Fig. 13)
1. Park machine on a level surface, stop engine, set
parking brake and remove key from the ignition switch.
Raise and support cargo box.
2. Remove drive belt from the drive clutch.
3. Remove starter/generator V--belt from the engine
pulley.
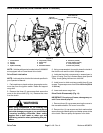
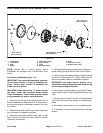
4. On vehicles with serial numbers below 310000000,
carefully remove plastic cap (item 12) from the drive
clutch.
5. Remove cap screw and washer securing the drive
clutch to the engine tapered shaft.
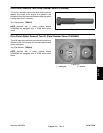
IMPORTANT: Lightly grease end of clutch removal
tool to prevent wear or damage to removal tool and
crankshaft. Prevent damage to clutch threads;
thread tool only enough to remove the clutch.
6. Use correct clutch removal tool (see Special Tools)
to remove drive clutch from the engine tapered shaft.
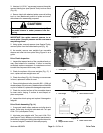
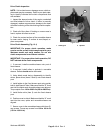
Drive Clutch Installation (Fig. 13)
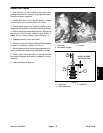
1. Thoroughly clean the tapered surfaces of the engine
crankshaft and drive clutch.
2. Slide drive clutch onto the engine shaft.
3. Apply Loctite #242 (or equivalent) to the threads of
the cap screw.
4. Secure clutch to shaft with cap screw and washer.
Torque cap screw from 25 to 30 ft--lb (34 to 40 N--m).
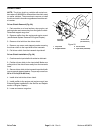
5. On vehicles with serial numbers below 310000000,
carefully install plastic cap to the drive clutch.
6. Install starter/generator V--belt to the engine and
starter pulley. Adjust belt tension.
7. Install drive belt to the drive clutch.
8. Lower and secure cargo box.
Drive Train