


6-34 Chapter 6: Programming
Model 801GC, 801GF & 801GX¥Rev. A
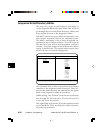
The Seq. Step primitive only appears if the image is
used in a test sequence that has step number dis-
play enabled. It draws the step number that the image
is a part of. The primitive uses three (3) parameters.
The first is the color. The next two parameters are
X and Y coordinates for the location of the top left
corner of the text box.
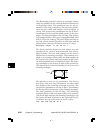
The following example draws a cyan step number
box near the top left corner of the screen:
Seq.Step Cyan 10 10
The “Insert,” “Delete” and “Move” buttons are used
to modify the drawing list. These buttons only work
when a step number is selected. The “Insert” button
puts a blank step at the selected position. All steps
below the insertion point are moved down. The
“Delete” button removes the selected step. All steps
below the deleted step move up. Pressing the “Move”
button lets you move the selected step to another
position in the list. The step is moved by rotating
the top knob. Pressing the “Move” button a second
time will leave the step in the new position.
You can test your image at any time by pressing
and holding down the “Draw” button. Releasing the
button will change the display back to the editor
screen.
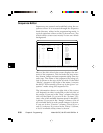
Pressing the “Save” button shows a window with
the name that will be used to save the image file to
non-volatile memory. The original file name is shown.
Saving back to the same file name will overwrite
the original contents. If you wish to keep the origi-
nal version of your custom image, you need to change
the name in the window using the bottom knob and
buttons. Saving a new image file does not automati-
cally add it to the Image list.
Pressing the “Exit” button leaves the custom image
editor and returns the 801G* to normal operation. If
there are an unsaved changes, you will be asked if
you wish to save your work prior to exiting.