


Groundsmaster 5900/5910 Hydraulic SystemPage 4 -- 139
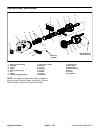
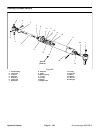
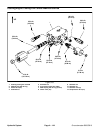
Removal (Fig. 101)
1. Park machine on a level surface, lower cutting
decks, stop engine, apply parking brake and remove
key from the ignition switch.
2. Read the General Precautions for Removing and
Installing Hydraulic System Components at the begin-
ning of the Service and Repairs section of this chapter.
3. Unlatch and raise hood.
CAUTION
The radiator and oil cooler may be hot. To avoid
possible burns, allow the engine and cooling
systems to cool before working on the oil cooler.
IMPORTANT: Make sure to not damage the radiator,
oil cooler or other machine components while loos-
ening and removing the fan motor.
4. Remove air intake box from top of radiator assembly
(see Air Cleaner Removal in the Service and Repairs
section of Chapter 3 -- Engine).
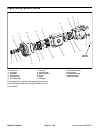
5. Remove hex nut (item6) and flat washer(item5) that
secure fan hub and fan assembly to fan motor.
6. Use suitable puller to remove fan hub (with fan at-
tached) from fan motor shaft taking care to not damage
fan. Position fan assembly away from fan motor.
7. Disconnect hydraulic hoses from cooling fan motor.
Put caps or plugs on fittings and hoses to prevent con-
tamination. Tag hydraulic lines for proper assembly.
8. Support fan motor to prevent it from falling. Remove
two (2) socket head screws (item 1) and lock nuts (item
11) that secure fan motor to fan motor bracket.
9. Carefully lower fan motor andremove from machine.
10.If hydraulic fittings are to be removed from fan motor,
mark fitting orientation to allow correct assembly. Re-
move fittings from motor and discard O --rings.
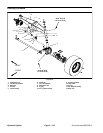
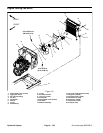
Installation (Fig. 101)
1. If fittings wereremoved from fanmotor, lubricate and
place new O--rings onto fittings. Install fittings into motor
ports using marks made during the removal process to
properly orientate fittings. Tightenfittings (see Hydraulic
Fitting Installation in the General Information section of
this chapter).
IMPORTANT: Make sure to not damage the radiator,
oil cooler or other machine components while
installing the fan motor.
2. Carefully position fan motor to fan motor bracket.
Loosely attach motor to bracket with socket head
screws (item 1) and lock nuts (item 11).
3. Remove caps or plugs placed during removal to pre-
vent contamination. Connect hydraulic hoses to cooling
fan motor (see Hydraulic Hose and Tube Installation in
the General Information section of this chapter).
4. Tighten socket head screws (item 1) and lock nuts
(item 11) to secure fan motor to bracket.
5. Thoroughly clean tapered surfaces of fan motor
shaft and fan hub. Position fan hub (with fan attached)
ontomotorshaftandsecure with flat washer(item5)and
hex nut (item 6). Torque nut from 27 to 33 ft--lb (37 to
44 N--m).
6. Install air intake box to top of radiator assembly (see
Air Cleaner Installation in the Service and Repairs sec-
tion of Chapter 3 -- Engine).
7. Lower and secure hood.
8. Fill reservoir with new hydraulic fluid as required.
Hydraulic
System