


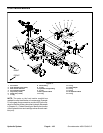
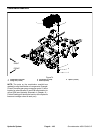


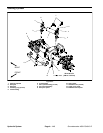
Groundsmaster 4000--D/4010--DHydraulic System Page 4 -- 110
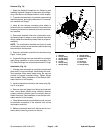
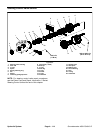
Control Manifold Cartridge Valve Service
1. Make sure the control manifold is clean before re-
moving the cartridge valve from t he control manifold.
2. If cartridge valve is solenoid operated, remove nut
securing solenoid coil to the cartridge valve. Carefully
slidecoiloffthevalve.
IMPORTANT: Use care when handling the cartridge
valve. Slight bending or distortion of the stem tube
can cause binding and malfunction. When remov-
ing cartridge valve from manifold, make sure that
deep well socket fully engages the valve base.
3. Remove cartridge valve from manifold using a deep
socket wrench. Note correct location for O--rings, seal-
ing rings and backup rings. Remove seal kit from car-
tridge valve and discard removed seals.
4. Visually inspect the port in the manifold for damage
to the sealing surfaces, damaged threads and contami-
nation.
5. Visually inspect cartridge valve for damaged sealing
surfaces and contamination.
A. Contamination may cause valves to stick or hang
up.Contaminationcan become lodged in smallvalve
orifices or seal areas causing malfunction.
B. If valve sealing surfaces appear pitted or dam-
aged, the hydraulic system may be overheating or
there may be water in the system.
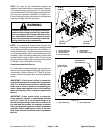
CAUTION
Use eye protection such as gogg les when using
compressed air.
6. Clean cartridge valve using clean mineral spirits.
Submerge valve inc lean mineral spirits to flush out con-
tamination.Particlesas fineas talcumpowdercan affect
the operation of high pressure hydraulic valves. If c ar -
tridgedesign allows,use awoodor plasticprobeto push
the internal spool in and out 20 to 30 times to flush out
contamination. Be extremely careful not to damage car-
tridge. Use compressed air for cleaning.
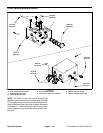
7. Install the cartridge valve into the manifold:
A. Lubricate new seal kit componentswith clean hy-
draulic oil and install on valve. The O--rings, sealing
ringsand backupringsmust bearrangedproperly on
the cartridge valve for proper operation and sealing.
B. Dip assembled cartridge into clean hydraulic oil.
IMPORTANT: Use care when h an dling the valve
cartridge. Slight bending or distortion of the
stem tube can cause binding and malfunction.
When installing cartridge valve into manifold,
make sure that deep well socket fully engages
the valve base.
C. Thread cartridge valve carefully into manifold
port by hand until the top O--ring is met. The valve
should go into manifold port easily without binding.
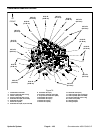
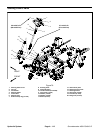
D. Torque cartridge valve using a deep socket
wrench to value identified in control manifold illustra-
tion.
8. If cartridge valve is solenoid operated, carefully
install solenoid coil to the cartridge valve. Secure coil to
valve with nut and torque nut to 60 in--lb (6.8 N--m).
9. If problems still exist after assembly, remove valve
and clean again or replace valve.