


Calibration - B
123
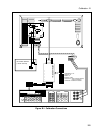
Rear panel transfer calibration switch
This push button switch is accessible through a recessed hole on the rear panel. When pressed, it initiates
a transfer calibration sequence inside the Agilent MCCD. This is useful if you have replaced an Agilent
E4374A Charger/Discharger card inside the mainframe. Note that the transfer calibration re-calibrates all
of the cards inside the mainframe. Indicator lights next to the transfer calibration switch indicate the
calibration status.
API Calls over the LAN
The following API calls let you access the calibration functions:
cfCal
begins a full calibration (mainframe and card)
cfCalStandard
begins a standard calibration (mainframe)
cfCalTransfer
begins a transfer calibration (card)
Refer to chapter 6 for more information about these API function calls.
Web-based Graphical User Interface
Refer to the on-line help provided with the Agilent MCCD User Interface for calibration information.
Calibration Error Messages
The two LEDs on the rear panel indicate the status of calibration and report calibration errors. More
extensive text-based error reporting is available through the Agilent MCCD User Interface and the API
functions.
CAL IN PROGESS
When flashing, it indicates that a calibration is in progress. Turns off when
calibration is complete.
CAL FAILED
When lit, indicates that calibration has failed. Use this indicator in
combination with the text based error reporting to isolate a failure as either
on a card or on the mainframe.
To read the text based calibration error messages, use the cfReadSelftestLog() API function. If you are
using the Agilent MCCD User Interface, you can read the error messages by accessing the System page,
selecting Calibration and Selftest, and then clicking on Calibration Log. Write down the calibration error
message and contact your Agilent Service Engineer.