


Greensmaster eFlex 1800/2100 GroomerPage 7 -- 23
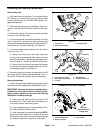
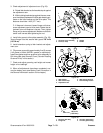
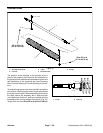
3. Check adjustment of adjustment cam (Fig. 29):
A. Rotate idler bracket so the bracket stop is against
the adjustment cam.
B. While holding bracket stop againstthe cam, mea-
sure the distancebetween the idlergear bearing sur-
faces on the idler bracket and the drive plate. This
distance should be 1.484” (37.7 mm).
C. If distance is incorrect, loosen flange nut that se-
cures adjustment cam to drive plate. Rotate the ad-
justment cam until distance is correct. Then, tighten
flange nut to secure adjustment. Make sure that dis-
tance is still correct after tightening the nut.
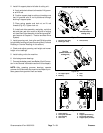
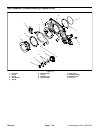
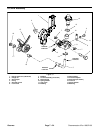
4. Install idler gears to drive plate assembly (Fig. 30).
Torque flange nuts that secure idler gears 120 in--lb
(13.5 N--m).
5. Install extension spring to idler bracket and adjust-
ment cam.
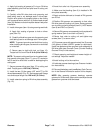
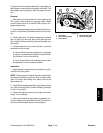
6. Fillgroomer cover with approximately five (5)ounces
(142 grams) of Mobil XHP221 grease (or equivalent).
Install new gasket and then groomer cover assembly to
RH drive plate (see Groomer Cover (Counter Rotating
Groomer Drive) in this section).
7. Check and adjust grooming reel height and mower
height--of--cut s ettings.
8. When all adjustments have been completed, con-
nect the battery pack (see Battery Pack Connection in
the General Information section of this chapter).
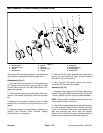
1. Groomer cover assembly
2. Screw (5 used)
3. Gasket
4. Handle
Figure 28
3
1
2
4
1. Idler bracket
2. Idler bracket stop
3. Adjustment cam
4. Idler bearing location
5. Plate bearing location
Figure 29
3
4
5
1.484”
(37.7 mm)
2
1
1. RH drive plate assy
2. Flange nut
3. 43T idler gear/bearing
4. 47T idler gear/bearing
Figure 30
3
1
2
4
120 in--lb
(13.5 N--m)
Groomer