


41
Section 4: Operating Instructions
12/15/15
RCF3696, RCFM3696, RCF3610, & RCFM3610 Rotary Cutters 326-600M
Table of Contents
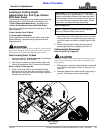
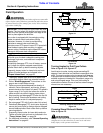
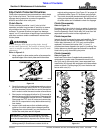
Cutting over ditches and backing up hills can tilt the
cutter’s back side up excessively resulting in “Bottoming
Out” the driveline. Bottoming out is when the driveline
shaft has shortened to the point it is pressing against the
gearbox and tractor PTO shafts. Once a driveline has
bottomed out, it can not be shortened anymore without
causing serious damage to the tractor PTO components,
cutter gearbox and driveline.
Do not operate a pull-type cutter at an angle exceeding
25 degrees up or down or at any angle that will force the
driveline to bind and/or hit the tractor drawbar.
Unhook 3-Point and Semi-Mount
!
WARNING
Always disengage PTO, put tractor in park or set park brake,
shut tractor engine off, remove ignition key, and wait for
blades to come to a complete stop before dismounting tractor.
1. S e e “Long Term Storage” on page 48 if cutter will
not be used for a long time.
2. Disengage PTO, park on a level solid surface and
engage tractor park brake.
3. Lower cutter cutter to ground as follows:
If equipped with hydraulic cylinder
a. Fully raise deck up to transport position, shut
tractor engine off, and remove switch key. Wait for
blades to stop before dismounting from tractor.
b. Remove stroke control spacers from cylinder rod.
c. Lower 3-point arms and rear axle until cutter is
resting on the ground or support blocks.
If equipped without hydraulic cylinder
a. Lower 3-point arms until cutter is resting on the
ground or support blocks.
b. Shut tractor engine off and remove switch key.
Wait for blades to stop before dismounting from
tractor.
4. If equipped with hydraulic hoses, disconnect hose
from tractor. Store hose ends on cutter deck.
5. Disconnect driveline from tractor.
6. Unhook 3-point hitch from tractor and drive tractor
forward several feet.
7. Reinstall hitch pins, linchpins, and hair pin cotters in
cutter hitch for safe keeping.
8. Collapse driveline by pushing tractor end of driveline
towards the cutter. Support driveline off the ground.
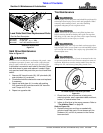
IMPORTANT: Always cross steep ditches and banks
at a diagonal. Never cross straight across and never
back into a steep ditch or bank.
Unhook Pull-Type
!
WARNING
Always disengage PTO, put tractor in park or set park brake,
shut tractor engine off, remove ignition key, and wait for
blades to come to a complete stop before dismounting tractor.
1. See “Long Term Storage” on page 48 if cutter is not
going to be used for a long time.
2. Park cutter on a level solid hard surface. Place tractor
gear selector in park and set park brake.
3. Fully raise deck up to transport position. Remove
stroke control spacers from cylinder rod and lower
cutter down until resting its skid shoes on the ground.
See “Hydraulic Cylinder Instructions” on page 34.
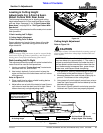
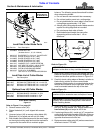
Refer to Figure 1-24 on page 27:
4. Remove parking jack (#12) from cutter deck and
secure to cutter tongue by fully inserting jack locking
pin (#13) through parking jack and mounting bracket.
5. Disconnect hydraulic hose (#8) from tractor. Store
hose ends on cutter deck.
6. Disconnect hitch safety chain.
7. Pull back on yoke collar (#9) and hold while pulling
driveline yoke from tractor PTO shaft. Store driveline
off the ground to keep universal joints out of the dirt.
8. Use parking jack (#12) to raise and lower cutter
tongue to the height needed to disconnect clevis
hitch from tractor drawbar.
9. Remove 1"-8 x 4 1/2" hex bolt (#3), flat washers (#5)
and locknut (#4) from the clevis hitch (#2).
IMPORTANT: Always place parking jack on a firm
surface or place a board under the parking jack for
additional support.