


Commissioning
975-0239-01-01 4–15
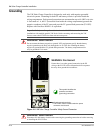
3. From the Select Device menu on the SCP, select a XW Solar Charge Controller (each
unit should appear as “MPPT60 00” where the 60 stands for 60A, and the 00 is its
device number).
4. On the MPPT Setup menu, ensure the Advanced Settings item is displayed. If
Advanced Settings are not displayed (and Basic Settings appears as the last item on the
menu), press the up arrow, down arrow and Exit keys together. (See “Advanced menu”
on page B-7 of the XW Inverter/Charger Operation Guide.)
5. Select Advanced Settings, then select the Multi Unit Config menu. After entering the
Multi Unit Config menu, the LCD backlight on the XW Solar Charge Controller to be
configured will flash.
6. On the Multi Unit Config menu, select Dev Number and set it to a number other than
00.
The device number can be set to any number between 01 and 31. For the first XW
Solar Charge Controller, 01 is recommended. If you have two charge controllers,
simply set them to 01 and 02.
7. Press Exit until the Select Device menu is displayed.
The XW Solar Charge Controller now appears as MPPT60 01 on the menu.
8. Repeat steps 3 through 7 for the next XW Solar Charge Controller.
When you have set the device number for all XW Solar Charge Controllers, you can
configure Connections and Charger Settings for the first XW Solar Charge Controller.
To configure Connections and Charger Settings for the first XW Solar Charge
Controller:
1. On the Select Device Menu, select “MPPT60 01.”
2. Navigate to the Multi Unit Config menu and select Connections.
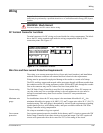
On the Connections menu, you can configure PV In (PV input) and DC Conn (DC
output, or the battery bank). If the system has only one battery bank, leave DC Conn at
the default setting. The PV In setting allows you to differentiate which array is going
to which XW Solar Charge Controller. This setting is used for status reporting only,
not for any internal controls. Setting PV In to a non-default value is optional.
3. Press Exit twice to leave the Connections menu and Multi Unit Config menu.
4. From the Advanced Settings menu, select Charger Settings.
5. Set the Battery Type, Battery Capacity, and any other charger settings required for
your system.
While in the Charger menu, ensure that the Nominal Battery Voltage is set correctly (it
is shown as Batt Voltage and appears as the last item on the menu). If you select
“Custom” for your Battery Type, you can further configure the Bulk, Absorption,
Float and other settings for the charge cycle.
The first charge controller should now be configured properly for your system.
If multiple charge controllers are installed, you can now copy the first unit’s
configuration over to other units.
To copy the XW Solar Charge Controller setup to another unit:
1. On the SCP, press Exit to leave the Advanced Settings menu and view the Select
Device menu.
2. On the Select Device Menu, select the next XW Solar Charge Controller for
configuration.